
I’ve screwed up. I’ve gone and wrecked my CPU Socket on my motherboard by splurging thermal paste all over it.
And when I say all over it, I mean all over it, everywhere.
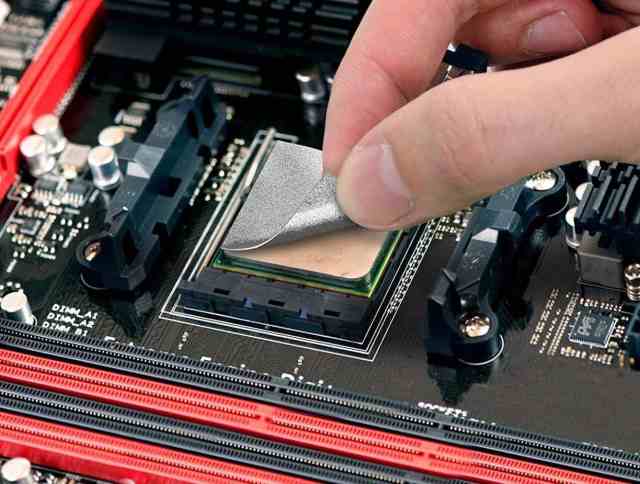
You know the stuff I’m talking about: that grey toxic sludge that comes packed in a syringe. The Goo that helps cool your CPU.
I thought my Motherboard was a goner. Dead to the world and in need of replacing… But, it turned out that wasn’t so…
After doing a bit of research, and naivety fueled experimenting, I discovered it’s actually possible to clean thermal paste and remove it from a motherboard’s CPU socket.
In this article I’ll show you:
- What types of CPU sockets there are and how it’ll affect the cleaning process
- What you’ll need for the cleaning process
- A step by step guide explaining the cleaning process
- A quick explanation of thermal paste and why you need the nasty stuff in the first place
- A fantastic alternative to thermal paste
Ok, now you know what I’ll be talking about, I’ll start with an explanation of the different types of CPU socket as they need slightly different cleaning techniques and you don’t want to mix them up…
CPU Socket Types and How They’ll Affect Cleaning
There are two different socket types. But don’t worry, they can both be cleaned easily.
Pinhole socket (PGA)
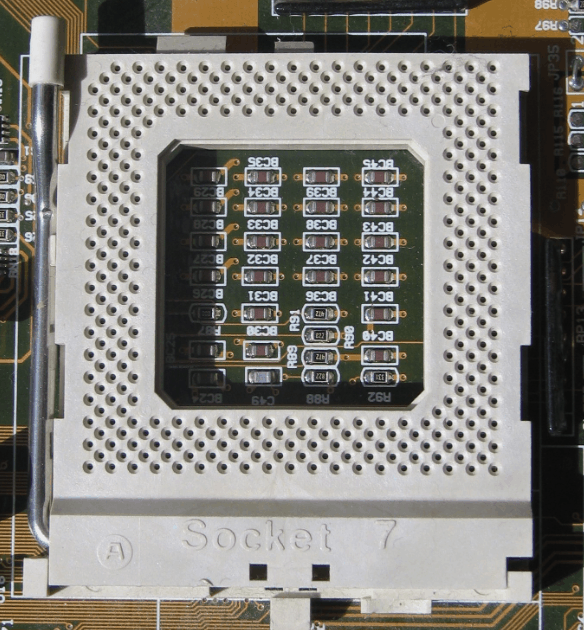
This type of socket has an array of holes arranged all over it. When you insert the CPU, pins on the CPU are inserted into the socket. This type of socket can be harder to clean due to the difficulty of prising all the thermal sludge out of the tiny holes.
These types of sockets are generally used by AMD as part of the PGA or Pin Grid Array socket types for the Ryzen family of CPUs.
Pin Socket (LGA)
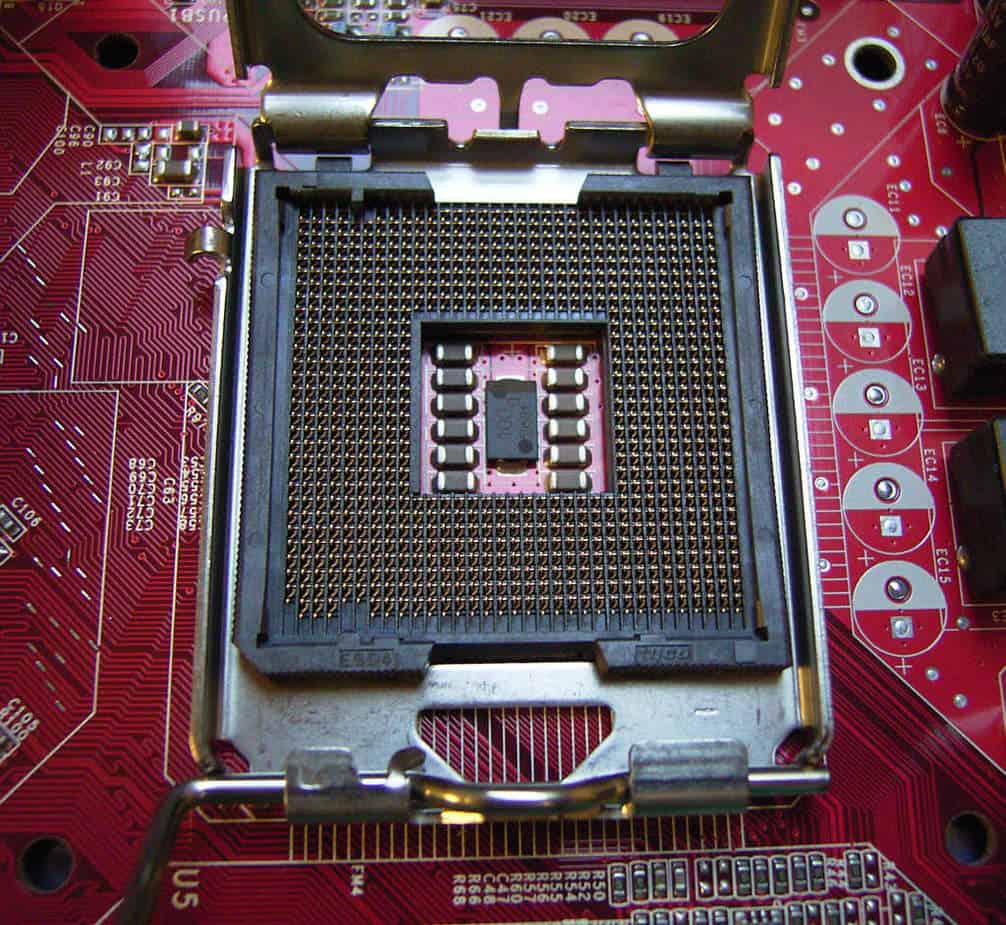
These sockets have little pins arranged in an array on them. The CPU has little rounded connectors on the underside, and you can literally drop the CPU (Not from too great a height) straight into the socket for easy installation.
These CPU sockets are used by Intel as part of the LGA or Land Grid Array socket types used with their ‘Core’ Line of CPUs .
Don’t worry, I’ll cover both types of socket in the cleaning process below.
Ok, now we’ve got that out of the way, let’s take a look at the tools we’ll need before we start cleaning.
How to clean thermal paste in your CPU Socket
Now you know the difference between the two main CPU socket types, let’s dive in and clean that socket!
What You’ll Need Before You Start
Before we start, let me tell you what you’re going to need to make this process work.
I’ve put together a handy little shopping list to help you get started. All the links are for Amazon, but you can just as easily pick this stuff up from any good Computer store.
- Extra Fine Toothpicks
- Arctic Silver Thermal paste cleaner
- Arctic Silver surface purifier
- Cotton buds or Q-tips.
- Lint-free cloths
- Magnifying glass
Once you have the above items in hand, you are good to start.
!!WARNING!!
I know this may sound really obvious, but don’t use water, at all, ever, to clean your CPU socket.
A long time ago in a house not very far away, A young and oh so very foolish version of myself thought a good clean with a damp cloth would do wonders for a dirt and flotsam filled motherboard.
Unfortunately, my far less wiser self turned on the PC only to be greeted by a flash of sparks, a puff of black smoke, and one very dead PC.
So the moral of the story is this:
Water and electronics do not mix.
Do not use water, even the smallest amount, ever while cleaning your pc.
The Process
Before starting this process, I’m going to assume that you’re attempting to clean your CPU socket with the motherboard outside your PC. DO NOT attempt to clean the CPU socket with the motherboard inside your PC case. It’s too cramped in there and you will make a mistake.
Also, it’s worth noting that thermal paste can’t harm your electronics. The only reason why the thermal paste stops your CPU from working is that the thermal paste gets in between the CPU and socket connectors creating a bad connection.
Step 1: Make space for you to work on the motherboard
Before starting, remove all the components from your motherboard.
This ensures you have plenty of room to work on the CPU socket, and that you don’t damage any of the components with an errant elbow.
Step 2: Assess your CPU socket
There are two types of CPU Socket:
1: Socket with holes for pins to be inserted (From now on called a PGA Socket).
2: Socket with pins for the CPU to sit on (From now on called LGA Socket).
The PGA Socket takes quite a while to clean, but generally, you can be a little rougher as there are no pins sticking up just waiting to be bent.
The LGA socket, the one with pins sticking up, is a little quicker to clean, but you have to be very careful not to bend the pins.
In this process, I’ll touch on both types of CPU socket.
If your CPU Socket is an LGA Socket with pins, move on to step 3. If you, your socket has holes, it’s a PGA socket so you can move directly to step 4.
Step 3: Determine LGA Socket Pin Direction.
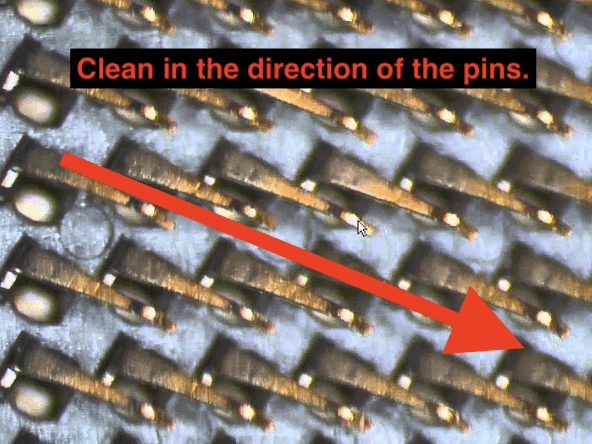
The pins on a CPU socket do not stick straight out perpendicular to the board like a flag pole sticking out of the ground.
Instead, they stick out at a roughly 45-degree angle.
The problem is, these pins can be bent extremely easily. When cleaning you must clean with the direction of the pin bend, not against the direction of the pin bend.
The problem is determining the direction of the bend.
If you look very closely at the pins with a magnifying glass you should see how the pins bend, and in what direction.
Take a look at the image above for an example.
You want to start any cleaning motion from the base end of the pin and work your way across to the tip end as you clean across the CPU socket.
If you go the other way, the pin will grip whatever cleaning cloth or Q-tip you are using and the pin will bend.
If you are having difficulty seeing the direction of the pin bend, try this:
Shine a bright light directly above the CPU socket, then look at the CPU socket with the magnifying glass at roughly a 45-degree angle, you should see the shadows cast by the pins on the edge of the CPU socket.
The direction of the pointing shadows indicates the direction in which you should clean.
Now that you’ve determined the direction you should clean, move on to step 4.
Step 4: Apply Thermal Paste Cleaner to the CPU socket.
It’s time to start cleaning so put a few drops of thermal Paste cleaner directly onto the CPU socket where the thermal paste is. Make sure you apply enough cleaner to fill all the holes and the gaps between the pins.
Do not add too much as to saturate the entire CPU socket. Only use as much cleaner as you need.
It’s better to use too little then add a little more on a second clean than to add too much.
Step 5: Leave the Thermal Paste cleaner for 5 minutes.
Thermal paste cleaner uses an emulsifying agent, a chemical that binds with molecules of thermal paste, to pull the thermal paste apart and away from a surface.
For it to do this, it needs to be left alone for a few minutes.
Once you’ve left the cleaner to do it’s thing for 5 minutes come back for Step 6.
Step 6: Clean the CPU Socket.
Now we have to start cleaning the CPU Socket for the first time.
If you are cleaning an LGA socket with pins, start by using a Q-tip and very gently brush in the direction of the pins.
DO NOT BRUSH IN ANY OTHER DIRECTION AND APPLY VERY LITTLE PRESSURE.
We are just trying to clean the tips of the pins.
Brush in a straight line. Then start another line next to where you started.
When lifting the Qtip away from the CPU be sure to lift away in the direction of the pins so as not to snag any of them.
You may notice a lot of thermal paste coming off immediately. If that’s the case, change Qtips immediately. If you let the Paste build-up you are only moving it around the socket and not cleaning it.
If you have a PGA Socket with holes, take out a plastic toothpick and start gently pushing the pick into each hole in turn, take your time and do this slowly and carefully. When you feel the slightest resistance, stop and pull the pick out.
Doing this should start to dislodge any thermal paste in the holes.
Then use a Qtip to mop up any grey goo that has been pushed out of the holes.
Step 7: Mop up the excess cleaning fluid.
By now, the cleaning fluid should be saturated with thermal paste particles, there’s nothing more to do than mop up the rest of the Cleaning fluid.
For LGA sockets with pins, using a Q-tip, gently place the end on the CPU pins. Do not move the cotton end. Just let it rest on the pins so it can soak up any fluid.
Then move onto another area and soak up more fluid. Keep doing this until either all the fluid is soaked up or the Q-tip is saturated.
For the PGA socket with holes, dab the top of the CPU Socket to absorb the cleaning fluid.
Once done, use a Q-tip and dab each hole, this will draw any fluid out of the holes.
Step 8: Do Steps 4-6 again, twice.
You need to perform steps 4 through 6 again two more times so you can thoroughly clean the CPU socket.
Do not rush. Take your time.
REMEMBER: The Thermal Paste is harmless to your CPU and motherboard. You only have to clean enough thermal paste from the socket to enable a good connection.
It will be very hard to remove all of the thermal paste. The more you clean the more you run the risk of damaging your socket.
You only have to clean the CPU socket enough for it to work.
Step 9: Drying time.
Now that you’ve performed the above steps 3 times, the CPU Socket should be fairly clean, it doesn’t have to be perfect. So long as the pins can make contact, that’s all that matters.
Now you need to leave the Motherboard to dry. Leave it in a warm dry place for a minimum of 24 hours.
Step 10: Purify the contact surfaces.
The next step is to purify the contact surfaces. For this, we’ll use Arctic silver Contact Purifier solution.
This time, put a couple of drops of solution onto a Q-tip.
For an LGA socket with pins, run the Q-tip in the direction of the pins, making sure you make contact but be gentle.
If any thermal paste comes off on the Q-tip, stop and do Steps 4-6 again. There should be no thermal paste left on the pin tips.
If you are cleaning a PGA socket with holes, apply the purification solution onto a q-tip and press it into each hole.
Again, if any thermal paste comes out onto the Qtip, stop and run through step 4-6 again.
Step 11: Remove excess purification fluid.
Next, get a dry Q-Tip and run it over the pins or dab the socket holes to remove any excess fluid the same way we did in step 7.
Step 12: Leave to dry.
Now leave the CPU socket to dry for 24 hours.
Step 13: Reinstall the CPU and PC and test.
Now that everything is cleaned, you should reinstall the CPU and components and test the PC to see if it works. If the PC doesn’t boot as expected, the Socket may still have a small amount of thermal paste on it. In that case, start this process again.
What is Thermal Paste and What Does it do?
For those who’ve never used thermal paste before, let me give you an explanation of exactly what this grey sludge does.
Thermal paste acts as a heat conduction medium between two surfaces. In your PC’s case, between a CPU and a heat distributor such as a heat sink.
Now, you’d think considering the CPU is metal and the heat sink is metal you could just mash them together and, sorted, your CPU would be frosty.
But unfortunately, it’s not quite as simple as that.
You see, the problem is, the top of your CPU and the bottom of your CPU heat sink are not actually smooth clean cut services.
Oh yes, to the naked eye and finger they masquerade as smooth and fissure-free.
But, look a little closer and the mask will fall off revealing the truth: the CPU and heatsink surfaces are gouged by gorges and valleys and pockmarked by what seems like micrometeoroid impacts. The CPU and heatsink contact surface is like the face of the moon… under 100,000 magnification of course.
When you take these two uneven surfaces that have been scared from industrial machining they don’t connect well. Only the peaks of these valleys make contact with each other.
So when CPU and cooler embrace, there are tiny gaps full of air that do not conduct heat well. So all the heat that the CPU creates is channeled through the small connections made either side of the valleys.
But these tiny connections cause a traffic jam of heat on the CPU surface, which sends your system crashing to a shutdown.
Thermal paste solves this problem by filling in all the valleys and dips to create a near-perfect atom for atom contact surface.
The Ultimate Thermal Paste Alternative
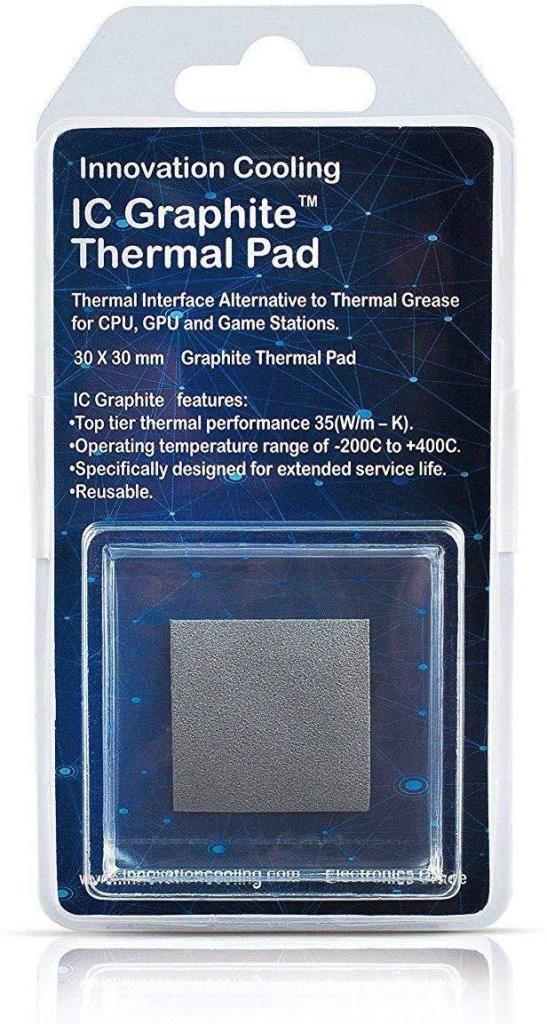
Since you’re looking at how to clean up thermal paste, you’ve got first-hand experience on how messy this gloopy goo really is.
It gets everywhere inside your case, and if you get it on clothes or carpet it’s nearly impossible to clean.
So I was wondering if there was an alternative.
And there is…
The Innovative Cooling Graphite Thermal Pad.
These pads are placed between the CPU and Heatsink just like normal thermal paste. Except there’s no mess, no fuss, and it takes seconds to apply.
Also, these pads offer thermal conductivity that rivals and even exceeds thermal paste from Arctic and Noctua.
And what’s even cooler is these pads are fully reusable. So, when it comes to upgrading your CPU you can just lift the graphite pad off your old CPU and reuse it on your new one.
But don’t take my word for it (even though I use one in my own gaming rig). Check it out, and its 900+ 5 star reviews, on Amazon here.
Summary Time
By now, if you worked through my process, you should have a clean and shiny CPU socket. But for your convenience, here’s a quick rundown of what we’ve learned:
- Thermal paste is vital for CPU cooling
- Thermal Paste is not conductive so won’t damage electronics
- Thermal paste cleaning solutions are none conductive so won’t damage electronics
- There are two types of CPU socket: LGA and PGA
- You’ll need specialist cleaning fluids to clean the socket
- You should always clean in the direction of the socket pins
- Be very gentle, the components are fragile
- Be sure to leave the motherboard to dry
- You do not have to remove all the thermal paste, just enough to make a good connection between socket and CPU
- There’s a fantastic alternative to thermal paste called a graphite thermal pad.
What Next?
I find thermal paste a bit messy. Is there a good alternative? Yes, there actually is a fantastic alternative called a Graphite Thermal Pad. Check them out here on Amazon.
My CPU Socket is now clean, but I’m a little bit unsure now how to install it, do you have a guide? We don’t currently have a guide on how to install a CPU. But you should check out this great guide on wiki how. It’ll tell you everything you need to know - minus the wit and charm you usually get here at Career Gamers.
Screw it, I’ve thrown my old CPU and motherboard in the bin and decided to upgrade! Where should I start? Take a look at this guide from PC Gamer Mag about how to select a motherboard. It’s the most important component in your case.
Main Image attribution:
Main image: By Darkone - Darkone, CC BY-SA 2.5, https://commons.wikimedia.org/w/index.php?curid=236221