Last week I was carrying my teammates in an Apex Legends match. We were caught in a tight spot but with luck, skill and a lot of thermite grenades, we were able to become Champions.
My friends praised me for clutching the win, but it was just another day for me. My friends were so impressed with my skills that they kept insisting that I record my gameplay and upload it to YouTube.
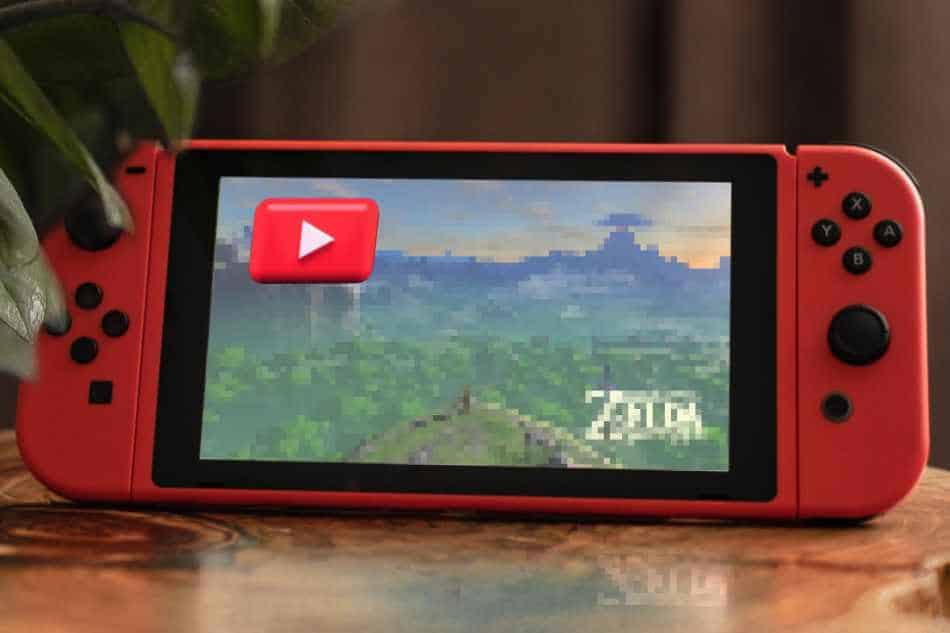
I always wanted to be a YouTuber… but I didn’t know how to record my Nintendo Switch gameplay and upload it…
Since all of this was new to me, I began researching the problem. And it dawned on me that I could be the only person struggling to capture gameplay to upload to Youtube. So I thought I’d write this article to help you out.
This is what I found out:
How to record Nintendo Switch gameplay for YouTube? You can record short, low resolution 30-second clips by holding the ‘Capture’ button on the left Joycon of your Nintendo Switch/Switch Lite console. Alternatively, you can purchase a Screen Capture Card to record or livestream high resolution, larger clips and save them directly on a PC for editing and YouTube uploading.
A Nintendo Switch allows for two kinds of gameplay recordings:
Free – built-in ‘Capture’ button
Paid – Capture Card
Let’s expand on these two ways of gameplay recording on the Nintendo Switch. Read on to find out how the free method of recording gameplay on the Nintendo Switch works?
How To Record Nintendo Switch Gameplay for Free?
Nintendo Switch was released in 2017 yet it has numerous features that makes it one of the most advanced gaming systems.
It doesn’t come off as a surprise that Nintendo provided a built-in screen recording and screenshot feature in the Nintendo Switch.
Don’t worry, you don’t have to download software or navigate in Settings to find the screen recording feature. Here’s what you have to do:
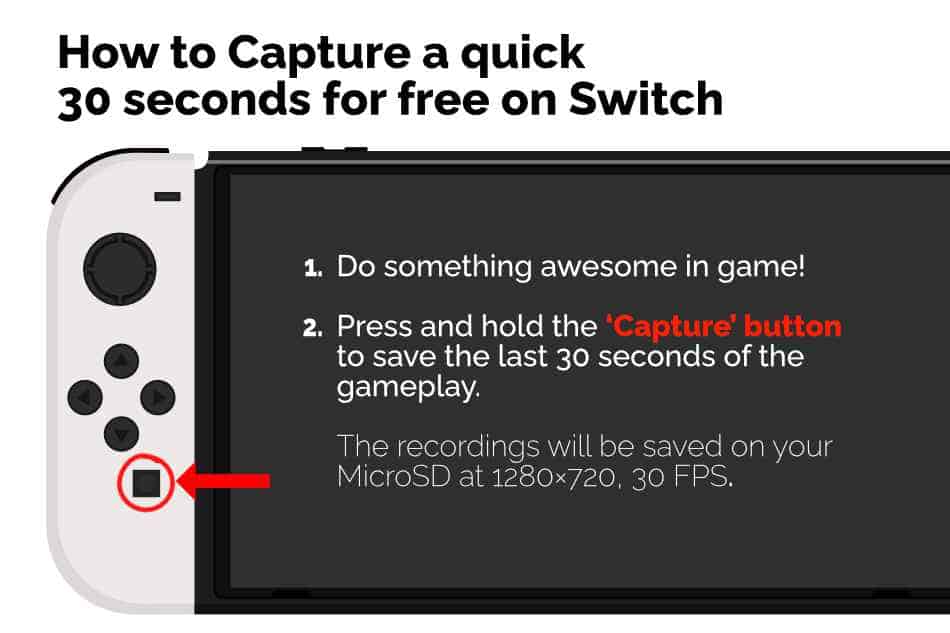
1. Start your gameplay.
2. Look for the square ‘Capture’ button, below the directional pad on the left Joycon.
3. Press and hold the ‘Capture’ button to save the last 30 seconds of the gameplay.
4. Press it once if you want to take a screenshot.
Through this method, you will get a 1280×720, 30 FPS screen recording of the last 30 seconds of your gameplay without paying a dime!
The recordings will be saved on your MicroSD card and you can transfer it to your phone or PC if you want to upload it to YouTube.
These 30 second clips can be great for YouTube Shorts, but for longer, higher quality videos, tutorials and live streams; you will need to get yourself a capture card.
Although, there is a way to get longer videos through Nintendo Switch and Switch Lite ‘Capture’ button. Read on to find out how!
How To Record Longer Videos On the Nintendo Switch For Free?
While recording and uploading longer videos in the Nintendo Switch requires a capture card.
There is a trick through which you can get longer screen recordings by the free gameplay recording feature in the console. This is how it works:
1. Record your gameplay by holding the ‘Capture’ button on your Nintendo Switch/Switch Lite.
2. Once the 30 seconds are completed, hold it again for additional 30 seconds of gameplay.
3. Keep recording as soon as each 30 second gameplay video ends.
4. Transfer all of the short clips on your PC.
5. Use a video editor like Adobe Premiere or Wondershare Filmora to join all the short clips together – creating a full gameplay length video.
6. Add effects, transitions, etc and you have yourself a full-length YouTube video!
Although this trick gets you a larger video; Following are some of the cons of this method:
- You will get a longer video for free but the video resolution would be 1280×720, 30 FPS.
- Constantly having to press the ‘Capture’ button after every 30 seconds would be a chore.
- A microsecond delay will look very unattractive in the end product
- You will need to insert a MicroSD card with large storage to accommodate all of the short clips.
This method works but it’s still a lot of work.
So, if you don’t plan on bearing the hassle of recording a large gameplay recording then spend some cash and buy yourself a Screen Capture Card.
Keep reading and find out what a capture card is and how to record gameplay through it.
What is a Capture Card?
A Capture Card relays video from a Nintendo Switch to another device that will record your screen. As a general rule, these devices function by first connecting Nintendo Switch to the card, and then sending a separate feed to a TV and a PC (so the player may continue playing on the TV while recording simultaneously).
Since the Capture Card utilizes an HDMI port; this method only works for Nintendo Switch and not the Nintendo Switch Lite.
There are numerous Screen Capture Cards available to purchase on Amazon but I recommend the Elgato HD60 S+ Capture Card for the Nintendo Switch.
This Screen Capture Card supports 4K @ 60 FPS and 1080p @ 60 FPS through HDMI output. Not to mention, it has pretty sleek aesthetics which is why I highly recommend it to my fellow Nintendo Switch gamers. It is a simple Plug-and-play capture card which won’t prompt you to download drivers. Elgato is one of the most popular screen capture card manufacturers and the HD60 S+ is a feature rich and future proof capture card.
You will still need to download screen recording software on your PC to capture and record your Nintendo Switch gameplay.
I recommend the Elgato 4K capture utility which allows creators to record gameplay and webcam video simultaneously.
However, software such as Wondershare DemoCreator screen recorder is a little more powerful. Not only can you record your video capture but perform minor edits with pre-installed templates.
Though if you are new to screen recording, I’d start off with Elgato’s software.
Now that we’ve settled on a capture card, let’s check out how to use that capture card to record gameplay on the Nintendo Switch.
How To Record Nintendo Switch Gameplay Via Capture Card?
A Capture Card might come at additional cost, but it is a great device if you want to record longer videos at higher resolutions or wish to live stream your gameplay.
Moreover, a capture card records your whole screen, so you can post any Nintendo Switch setting tweaks or tutorials.
While on the Free Capture mode, you can only record gameplay. Here’s how you can record your screen through a capture card.
Things you will need:
- An Elgato HD60 S+ Capture Card
- Nintendo Switch
- Nintendo Switch Dock Set
- Two HDMI cords
- A male-to-male USB 3.0 cord (should come with the Capture card)
- A PC to receive video information
- Screen recording software
- Out-of-this-world gameplay for your subscribers (Optional)
If you tick every box of the requirements then it’s time to get down to the real deal and start using your capture card to record or live stream your gameplay.
Here’s how:
- Connect an HDMI cord from your Nintendo Switch Dock to your capture card ‘HDMI in’ slot.
- Connect the second HDMI cord from your capture card’s ‘HDMI out’ port to a monitor or TV.
- Plug in the USB 3.0 cord from the capture card to a PC.
- It can be automatically detected by your computer as an HD capture card.
- Download and Install the Elgato 4K capture utility.
- Run The elgato software and follow the on screen instructions to set up your capture card to record your gameplay.
- Start recording your Nintendo Switch screen in high resolution.
The Elgato card will set you back a hundred bucks or so. But it’s easily worth it if you want to take your streaming and youtube gaming channel seriously. There isn’t a better capture card on the market.
Fancy a video explanation? Well, you in luck: Take a look at the vid below to see how to set up your Elgato for your Nintendo Switch:
In the next few sections, I’ll look at how to set up the capture card in a little more detail.
How gameplay will be recorded by your Capture Card?
As mentioned above, you know that you need to connect two HDMI cords to the capture card.
The other end of the first cord plugs into your Nintendo Switch console while the end of the second HDMI plugs into your TV.
You will need to connect your screen capture card to your PC/Mac using a USB 2.0 (for low resolution) and USB 3.0 (for high resolution).
If you bought the Elgato card mentioned above, it should come with a USB 3.0 cable.
To break it down for you:
- The Nintendo Switch’s screen will be mirrored by the capture card to the monitor using the USB cable.
- The PC will capture the display on the screen via a screen recording application such as Elgato’s 4K Capture Utility on Windows/Mac or OBS on Linux.
- The recorded video will be either stored on your computer’s HDD or live streamed to your YouTube channel (as per your settings).
That is the basics of how your gameplay will be recorded through a screen capture card.
The question still stands: how will you connect an HDMI to your Nintendo Switch console when there are clearly no HDMI ports on it?
That’s easy! The ‘Nintendo Switch Dock’ connects your handheld console to a monitor or a TV.
How?
Read on to find out!
How To Dock Your Nintendo Switch To Record Gameplay?
The Nintendo Switch dock utilizes the USB-C port on your handheld console and provides an HDMI output.
You can plug that HDMI output to a monitor or TV and connect your Switch to it.
In this way, you can play your Nintendo Switch games on a larger screen.
This dock will come in handy if you want to record your Nintendo Switch gameplay via a screen capture card.
If, in case you lost your Nintendo Switch Dock or broke it. You can purchase a new original Nintendo Switch Dock Set or go for a cheaper dock such as a Ponkor Docking Station which might do the job but won’t be as durable.
Once you have your dock and console ready, here’s how you can connect it to record your gameplay videos.
1. Open the back panel of your Nintendo Switch Dock to reveal two ports.
2. Insert an HDMI cord in the HDMI port and the USB type C with the AC wall charger in the second port.
3. Connect the HDMI to the ‘HDMI in’ port of your Elgato capture card.
4. Turn on the power on the AC wall charger.
5. Insert your Nintendo Switch inside the dock.
6. Align your Nintendo Switch in such a way that the USB-C port on the Switch inserts in the USB type C inside the dock.
7. Once the Nintendo Switch is docked, it will automatically display on the monitor or TV your capture card is connected to.
Now that the display is all set, the only thing that remains is capturing the gameplay footage on the computer.
But who will send the memo to your PC that a screen capture card is plugged into it? In other words, would you need to download particular drivers or software for the capture card to work? Read on to find out!
How to set up a capture card to record Switch gameplay on PC?
Almost all capture cards support Windows 10/11 by default.
There will be no need to download additional drivers for your PC to recognize your capture card.
However, you will need to download a screen recording app like Wondershare DemoCreator, OBS screen recorder, or Elgato’s own 4K capture Utility to record your gameplay videos.
I recommend downloading and using Elgato’s software as it’s simple to use and a great way to get recording your gameplay quickly. Once you’ve become used to recording your gameplay, you can download and use the more powerful OBS software.
If you need additional editing for your video, you can also download video editing apps like Wondershare Filmora, Adobe Premiere Pro, etc. Or you can use free video editing software.
This might seem like an obstacle for our Mac users reading this post.
But you can connect a capture card to a Mac computer as well!
Read on and find out how you can set up and connect a capture card between a Nintendo Switch and an Apple Mac.
How to set up and connect a capture card with a Switch and Mac?
The Apple Mac is no different than a standard Windows PC.
Well, except for OS and software compatibility of course.
Which is why the method to set up and connect a capture card with a Nintendo Switch and Apple Mac is pretty much the same.
While you will need to download the screen recording software which is Mac compatible.
OBS screen recorder is one of the most popular screen recording software for the Nintendo Switch which is compatible on Windows and Mac.
It is an open-sourced video caster and recorder. Which means that it is a free software that will record or live stream your gameplay videos.
However, I’d recommend downloading Elgato’s 4k Capture Utility. It’s easy to use and will run you through the setup process and have you capturing gameplay in minutes.
The process for recording your screen on Windows and Mac OS is pretty much the same.
Just keep in mind the Elegato software is not compatible with Apple Silicon Macs such as the Apple MacBook M1.
For that, you’ll need to use 3rd part capture software such as OBS. Take a look at the video below to see how to set up OBS on Apple silicon:
Next, Let’s check out if Nintendo Switch gameplay video recording via the screen capture card is the same on a Linux PC as well.
How to setup and connect a capture card with a Switch and a Linux PC?
Yes, it is! The only difference between these three OS and recording your gameplay videos on your Nintendo Switch are the software you download.
Fortunately, the OBS screen recorder is downloadable on Windows, Mac and Linux operating systems.
However, as with all things Linux, installing and using OBS can be a little more complicated. But don’t worry, I’ve got you covered. Below is a video tutorial showing you how to set up OBS on Linux.
Which Recording Method Is The Best? Free Vs. Paid
Both methods of gameplay recording work on the Nintendo Switch. Take a look at the comparison chart below and single out the best screen recording method on the Nintendo Switch for you!
| Free Recording Through The ‘Capture’ Button | Using a ‘Capture Card’ To Record Gameplay |
|---|---|
| You can only record 30 seconds of gameplay through the built-in screen recording feature in the Nintendo Switch and Switch Lite. | You can screen record your Nintendo Switch for as long as you like. |
| You can only record at 1280 x 720p @ 30FPS | The resolution and FPS depend upon the capture card you purchase. It can go up to 4K @ 60 FPS. |
| You can easily press and hold the within-reach ‘Capture’ button to start recording. | You will need to set up your monitor, PC, the capture card and connect them with cords before you can record. |
| It works on the Nintendo Switch and Switch Lite consoles. | Only the Nintendo Switch supports HDMI output so Nintendo Switch Lite cannot connect to a capture card. |
| It’s completely free! | You will have to purchase a capture card starting from $20 - $200. |
| You cannot live stream your gameplay recordings. | You can live stream your gameplay through a capture card. |
| Only gameplay can be recorded. | You have the freedom to record your Nintendo Switch screen as soon as it starts and display settings tricks and solutions to common Switch software problems. |
| It’s perfect for uploading short clips for YouTube shorts or stories on Social Media apps. | The capture card is useful for streamers and people who want to upload full-length videos on YouTube in high resolution and without any resolution or FPS restrictions. |
Obviously, paying for a sum of money for gameplay recording will have an upper hand on free gameplay recording.
In the end, it all comes down to your preferences and budget. Pick out the mode that suits you best.
Let’s go into a bit of detail on how to set up and use a capture card.