Nowadays, entry-level computers cost less than $500 and fully equipped computers sell for a minimum of $1,200. Factoring in the price, and your personal requirements, it‘s a difficult decision whether you should buy a pre-built PC or a build one yourself. If you decided to build your PC yourself, you’ll save money. But if you build your PC from used parts, you’ll save even more cash.
How can I build a PC with used parts? Building a PC from used parts is just like building a PC with new parts except it’s far cheaper. Used parts can be bought from a number of online shops including eBay, Amazon, and Craigslist.
But before diving into the daunting, but fulfilling, task of building your own PC using spare parts, first you need to know if it’s the best option for you. We’ll explore PC building and the advantages and disadvantages of using used parts in the following sections.
Why build a PC using Spare Parts?
For PC lovers, the fundamental almost philosophical question that we often ask is: should we build or buy?
Both sides of this argument have merit. And both have their own strengths and weaknesses. But if you’re wondering if it’s worth your time, money, and energy to build a PC using spare parts, the following are some of the reasons why you should consider used parts for you next build.
More Options
When you buy a prebuilt PC, you get it as is. You might have some options such as more memory, better monitor, or faster processor but you get the bundle that the PC manufacturers already set.
If you want more options with regards to other components, you’ll often be out of luck. The average PC user rarely asks manufacturers to change parts such as the motherboard or power unite. You’ll be stuck with whatever they give you. And it’ll often be the cheapest option.
Most of the time, what you get when you buy a PC is also a matter of chance. High-volume pc vendors like Dell and Gateway often have multiple sources for their computer components. It is not surprising that even PCs with the same model number are made by different manufacturers containing slightly different parts.
However, If you build your PC yourself, you’ll know exactly what parts are going inside it.
Optimum Configuration
One of the most important advantages of building your own PC from used parts is you can focus on the component that’ll offer the biggest performance advantage: the Graphics card.
Commercial PCs available in stores are by nature a compilation of mostly average parts. It is meant to be used by average users and not by the discerning PC gamers.
Additionally, building your gaming computer give you the freedom to assemble your dream configuration.
Do you want to store your entire collection of TV shows and movies? You fill your computer with multi-terabyte hard drives
Or, do you want your PC to be as quiet as a mouse? You can choose specific parts that are tailor made for silent build PCs.
Buy a PC from a vendor and your stuck with what they want to build. Build your own PC, and you can have whatever you desire.
And because you making use of used parts, there’ll be far more options open to you than if you went new.
Better Quality of Components
It’s standard practice amongst computer vendors to cut costs of their production by using a cheaper OEM (original equipment manufacturer) alternative to visible components.
And it gets worse for components that are not visible.
Visible components are those that people look for when buying a PC like NVIDIA graphics cards. Invisible components are those that are rarely mentioned such as optical and hard drives, power supplies, and motherboards.
PC manufacturers will cut every corner they can to maximise profits. So even if you buy a top tier PC, there’s a good chance that the company has saved on costs by using low quality but low ‘visibility’ components. These can include low quality cables, power units, drives, fans, and other parts that you wouldn’t think were important.
But if you’re building your own PC, you get to make the choice on every component and it’s quality.
But how does this tie into used parts?
Well, used parts opens up a library of options to you. And because you’ll save so much money going used, you’ll get more bang for your buck so your PC can house high quality parts for less money.
Buying new means buying expensive.
Fewer Problems
When you build your own PC, you’ll be educating yourself on the inner workings of your PC. This’ll give you a better understanding of each component, what they do, and how they fit together in the grand scheme of your gaming PC.
Also, this newly acquired knowledge puts you are in a better position to solve any issue that might arise. If self build your PC, you’ll have the necessary skills to fix any problems. Empowering you now and in the future.
More Environmental Friendly
Tons of computers and spare parts are being dumped yearly primarily because of the decreasing lifespan of cheap, pre-built computers. But working on your own PC gives you have better control on how to extend its use. By using more compatible components, you are prolonging the use of your computer.
And using spare parts is technically recycling. Therefore, you are saving these parts from being a part of huge electronic trash.
Additionally, because you are building a PC from used parts, you are saving components from a life consigned to trash heap somewhere.
It’s a sad fact of our modern consumer society that we’re happy to throw out electronics components that are sometimes, no more than 12-24 months old.
By putting these used parts in your PC, you’re not only helping your wallet keep hold of its cash, but you’re helping the world keep hold of its environment.
Way More Cost Effective
Although nowadays, most vendors are trying to compete with DIYs in terms of specs, it is still way cheaper to build your own PC with used parts as compared to buying a new.
For example, I bought a used Nvidia GTX 970 for around £130. New, that graphics card was double that price.
If you look on ebay right now, you’ll find dozens of cards selling for well under 50% their original retail price. And that’s just ‘buy it now’ deals. If you’re willing to bid on an auction, you can get components for even less.
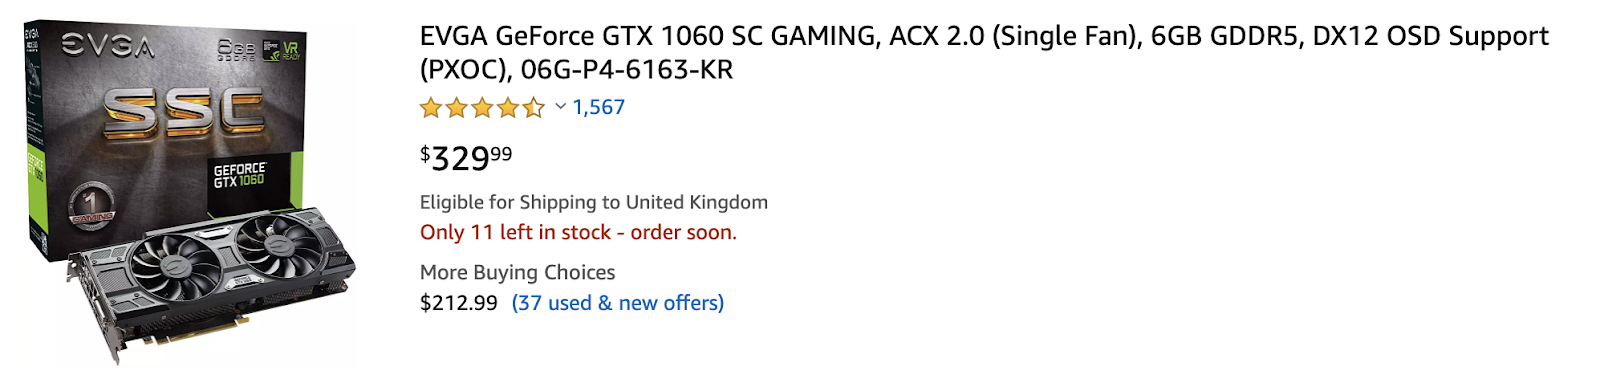
Take a look at these two images Below. The first is a Nvidia GTX 1060 6GB card on Amazon. At $329 it’s not too expensive. But it’s still more than a games console.
Now take a look at this card on ebay. It’s exactly the same type: an Nvidia GTX 1060 6GB.
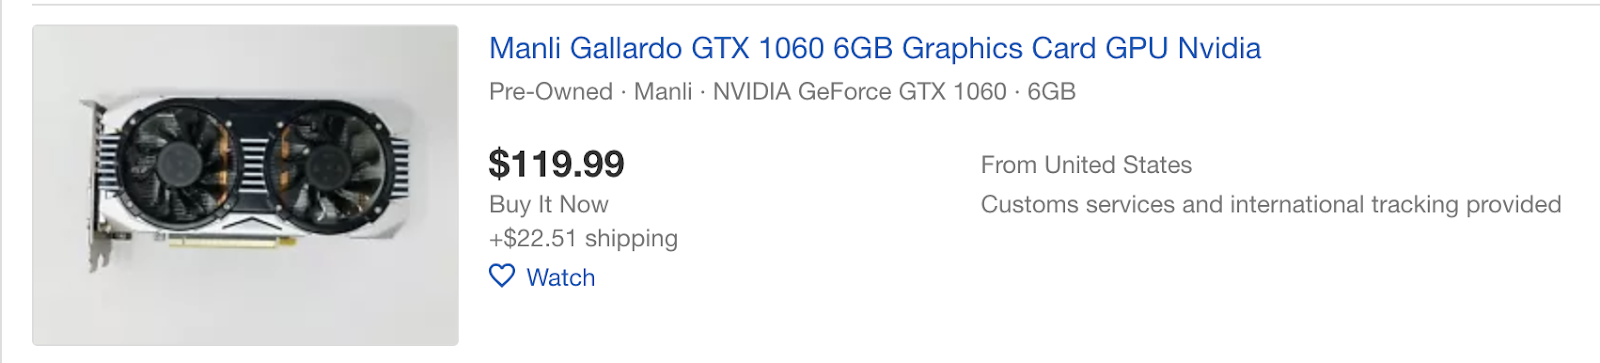
The ebay card, though used, is over $200 dollars less! 200 dollars! Ignore the shipping. It’s quoting a silly number because I live in Wales in the UK.
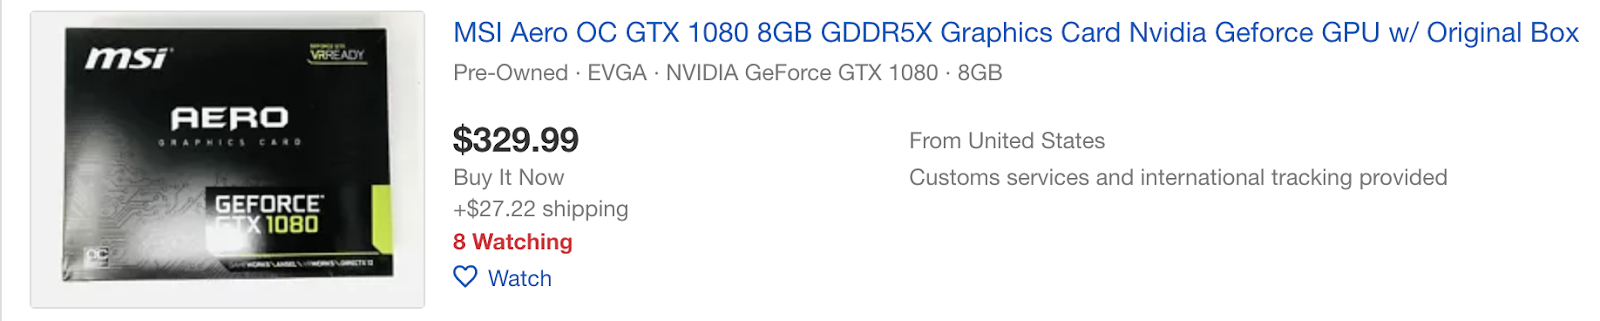
But as you can see, buying used can be a huge money saver. But say you were adamant that you were happy to spend $300. Well, buying used means you can level up to the next best card or even further.
Here’s an example of a card below that is far superior the new GTX 1060, but costs the same if bought pre-owned.
So buying used has serious financial benefits. Especially when it comes to graphics cards.
What are the parts you Need to Build your Own Pc?
Whatever type of games you are playing, there is always this burning desire to have better gaming experience. Whether it’s higher resolution, better graphics, or high frames per second, gamers want more. Maybe it’s about seeing the graphics in 4K. Maybe it’s having lightning fast reaction times for online play. Whatever that reason might be, you deserve it.
But, it’s always a question of “how much?” And most often than not, building your dream gaming rig - rig is another name for computer - will often cost you thousands. But that won’t be the case if you are building your own PC from used parts.
If building a PC from pre-owned parts interests you, then the first thing you need to know is what parts you’ll need.
CPU / Processor
The CPU or central processing unit is your computer’s brain. It handles all the major tasks your computer does at any one time all the time. And faster CPUs with more cores means tasks get completed quicker. Therefore, the better the CPU, the faster your computer will be.
There are a lot of specs that you will encounter when comparing CPUs. If this is your first build,then you’ll need to do a little research. However, a good starting point is an Intel i5 CPU Or a Ryzen 2500 series CPU. Regardless of which of these types of processors you buy, your guaranteed to get a fantastic gaming CPU.
You can also read recommendations and reviews online and pick the best based on the community votes.
Motherboard
The Motherboard is a crucial part because it holds your PC components together. It also lets all the different components communicate with each other. And let lets you plug peripherals into your PC.
A motherboard is specifically planned out so all the different components a PC uses has a specific slot to slide into. There’s unique slots for each components so you don’t accidently put a ram stick into a CPU slot for example.
Think of it as an actual mother in a family. She decides where everything is and makes sure that everyone is in their places. Without a motherboard, you just have a pile of useless components.
Memory
RAMIs a vital component of modern computers. RAM or random access memory is a storage area for currently used programs and data. Unlike hard drives, RAM is extremely fast at transferring data in real time to to the CPU for processing.
For your computer, it is enough to have 8GB of RAM, the standard in most laptops nowadays. But for your gaming needs, having 16GB is more than enough according to most gaming enthusiasts. Check the capacity of your motherboard before buying RAM.
Graphics Processing Unit
Also known as GPU, video card, or graphics card, is the most important component inside a gaming PC. It’s the flashy part of your computer and makes your visual experience fancier. A GPU is what pushes create the amazing graphics you see on screen.
It effectively works by working out what should be on screen at any given moment and draws a static image of the action. Then it draws another static image and another. Each image slightly different from the last. Draw enough of these images fast enough on screen and you create the illusion of motion.
So the better your graphics card, the more images it can draw per second. And high quality each image can be.
There are some online sites where you can test your graphics cards. They also publish reviews of graphics cards so you’ll know their flaws. By reading those reviews, you’ll have a good idea of what to choose.
Graphics cards names can be a little confusing. However, generally, the higher the number, the better. When it comes to newer graphics cards.
For example, a Nvidia GTX 1080 is a lot better than a Nvidia GTX 1060. And an AMD RX580 is better than a AMD RX560. However, it get confusing when comparing different manufacturers.
So, if your unsure, type in “graphics card name” vs “graphics card name” in Google and you’ll usually find a comparison showing you which card is better.
For example, type in RX 560 vs GTX 1070 in Google. Then click on any link that has https://gpu.userbenchmark.com in the URL.
You’ll get a screen like this:
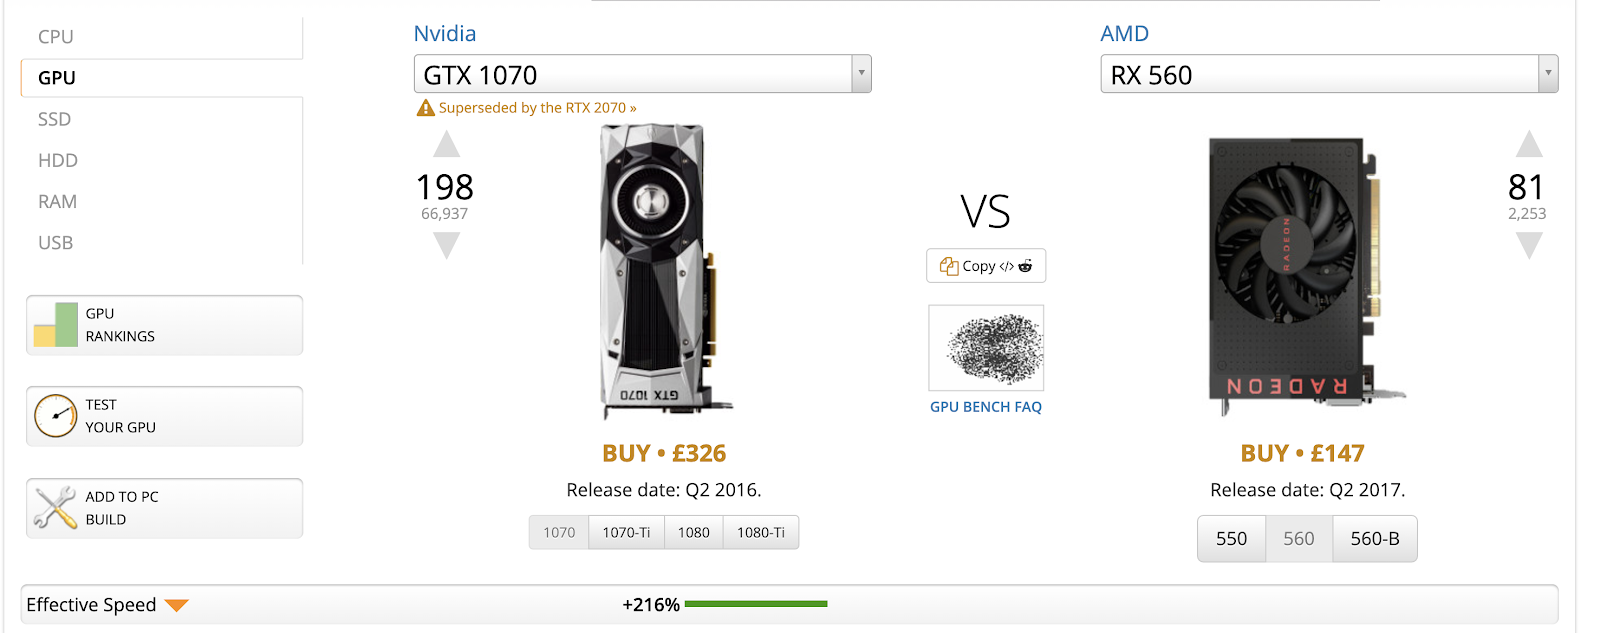
The important part is the green bar down the bottom which shows you the relative performance difference. In this case the GTX 1070 is 216% faster than the RX 560.
This can also be done for CPU’s and other components.
Storage
Deciding how much storage you’ll need is a tricky because if you’re like most people, you’ll never be satisfied. But generally you’ll want two things:
- A decent amount of fast Solid state drive (SSD) storage
- A lot of standard hard drive storage
Solid state drives are extremely fast all electric hard drives. They can be anywhere from 10 times to 100 times faster than a traditional hard drive. This means game will load in seconds instead of minutes.
The only problem with SSDs is they are more expensive than traditional hard drives. However their price is dropping every day.
You can buy used 500GB SSDs on ebay for less than $50. Where as new they sell for double that price.
Hard drives, on the other hand, come in far larger capacities. It’s no uncommon to see 5TB hard drives in computer these. Days.
Traditional drives offer far slower speeds. But do give you massive storage capabilities.
You can also find 3TB drives on eBay for well under $50.
Power Supply
This is one of the most important components of your PC system as it will literally power everything. Having a tested quality power supply unit is essential.
Although many PC enthusiasts will discourage you to use pre-owned parts power supplies, I would reconsider. I’ve got a 750W used power supply in my gaming rig which as been running flawlessly for over 2 years.
And how much did I pay for it? £20, buy it now, on eBay.
Where to Get Computer used Parts Online?
Now that you’ve decided to build your own PC using used parts, the next logical thing to do is to find where you can get those parts. Fortunately, there are many reliable websites where you can purchase the parts that you need. No more hassle of going to the stores because you’ll get them straight to your door.
But before you get too excited about choosing the parts that you’ll buy. A good practice is to check first PC Part Picker, a great site where you can build a PC so you’ll know the total market price of the PC you’re building.
Newegg.com
This site has a lot of refurbished parts on offer ranging from hard drives to video cards to webcams, and to all other parts that you might need.
One thing I love about them is their great return policy. It’s hassle-free and more secured so even if you buy spare parts from them, you are assured that you will get a quality one.
They also have daily deals they call Shell Shocker. I really think the name speaks for itself because the prices are shockingly low. Also, they have eggextra! or those almost permanent deals on their site.
Micro Center
When talking about CPUs, there is no other place you should check first but Micro Center. They have the cheapest CPU Used parts online.
They also have physical stores if you want to visit their shop. If you happen to live near a branch, you can order parts online and pick it up the next day. It’s very convenient for those who are busy and need something urgently.
Their physical stores are amazing. You can stay there the whole day enjoying their game setups. They also have computer experts as staff and they will patiently answer any question you might have.
TigerDirect.Com
Whenever I shop for spare parts, the first thing I do is to compare prices from Newegg and TigerDirect and just buy from whoever is cheaper
They also have an amazing shipping policy. If you ordered items worth more than $100, you will get free shipping.
This company has been in existence since the 80’s so they have built and maintained their stellar reputation.
Amazon and eBay
Of course, there will always be a good deal you can find in Amazon. You get other perks too if you are an Amazon Prime Member.
For eBay, we all know that this is perfect to look for bargains. If you don’t mind reusing other people’s spare parts, and you have the courage to trust a person based on his store feedback, then go for it.
There are many stores that can provide you with quality spare parts that you might need in building your own pc. I would suggest that you try to visit physical stores because that’s when you can ask questions and recommendations.
However, if you are already expert in this, or you already have enough knowledge, then the convenience of ordering spare parts online will work on your favour.
Step by Step Guide on How to Build PC Using Spare Parts
The following instructions will tell you how you can personally build a computer using used parts. But you have to understand that these instructions are based on the actual used parts used. If, you do not have the same spare parts, use these instruction as a guide only. This is meant to assist you to understand the principle of building a PC.
You will also need to be familiar with what the inside of the computer looks like. This guide is to those who already have an understanding of the structure of the computer, so you won’t get lost when looking for the locations this guide is telling you.
In order to start our project, you’ll need the following:
- ATX Motherboard
- ATX Case
- A Power Supply
- 500GB Hard Drive
- PCI-E Graphics Card
- PC3200 RAM
- SATA Cables
- CPU Cooling Fan
- CPU
We will also be using the following acronyms:
MB- Motherboard
SATA- Serial Advanced Technology Attachment
IDE- Integrated Drive Electronic
HD- Hard Drive
You will also need:
#2 Philips Screwdriver
Thermal paste
Step 1: Opening the Case
First, be sure your PC is unplugged from the electricity supply, we don’t’ want any accidents now, do we.
To open the case, remove the screws holding the side panel on. The side panel can be removed by unscrewing two screws on the back: one at the bottom, one at the top. Then slide the panel back for about half an inch. finally, lift the panel off, slightly tilt the top away from the case.
Most PC cases have the same way of opening. Remember that what we are using already have a power supply installed.
Step 2: Install the CPU
On the motherboard there is a little metal arm near the CPU Socket. This releases the CPU plates that hold the processor in place. Pull the metal arm to the side, then up. This should let you lift the plate up showing the bare CPU socket.
Now. Take the CPU, and look at the corners, there should be little arrows, except on one corner where there is a dot. Align the dot corner on the CPU with the dot corner on the motherboard. Carefully slot the CPU into position.
Now fold the CPU flat back down onto the CPU. The Pull the metal arm down and fold it back into position. This may take a little force. But that’s normal.
Next, apply some thermal paste to the top of the CPU. You only need a small blob in the centre. This is to create a good contact between the CPU and the cooling fan.
Next, let’s install the cooling fan.
Step 3: CPU Cooling Fan
A CPu cooler usually comes in two parts:
- The base.
- The cooler
The base attaches to hole that are situated around the CPU. This base holds the cooler in place and it can be tightened to ensure a clean contact with the CPU.
The first step is to look for the 4 holes that are surrounding your your CPU socket. Gently push the connector of the cooler’s base through the holes. You should hear a click.
Now take the main section of the cooler and lick it into place on top of the cooler base.
The cooler should move and maybe a even rock a little. Now you need to tighten the base screws.
Gently turn 1 corner screw 3 turn of the wrist. Then move diagonally to turn the next screw. Then move to the next and the next. Turning only 3 wrist turns. Keep doing this until the screws feel tight, but not over tight. Check the cooler is isn’t wobbling any more.
Once it’s stopped wobbling. Plug the cooler fan into the motherboard and your done.
Step 4: Installing the Motherboard
The first step is to check the orientation the motherboard (MB) should be mounted. Look at the back side where you can install the MB ports. They should fit into a large oblong cut out on the back panel of the PC case. Once the motherboard has been coerced into place, lightly screw the whole MB down using holes provided all over the motherboard. Only tighten it once you are sure that it is the correct position.
Step 5: Installing the DVD Drive
While you might argue that everything is downloadable now and that there’s no real use for a DVD drive, you are very wrong. There are still a lot of vintage games that are only available through DVD installer. And besides, this is your own computer, if you don’t like this part, just skip this.
Align the drive flush to the front opening of the case. Insert your drive into the machine carefully maintaining the alignment. In the provided in the side of the computers incase, lightly screw the DVD drive into its place. Tighten the screw once you are 100% sure that you are satisfied with the placement.
Step 6: Install the Hard Drive
Find the location of the the first, it should labeled on the motherboard, hard drive SATA connector on the motherboard. Plug in a SATA lead and leave it ready to connect to the hard drive. Now, find the 3.5 inches bay inside the case for each hard drive with 2 screws, 2 on each end. Insert the hard drive, then plug SATA cable into the back of it. If you have more HD to install, just repeat the process and place the HD next to each other.
Step 7: Install RAM
Normally, there are four sockets in a motherboard for your RAM. This will determine the maximum RAM your computer can hold. When you find the sockets, gently set the first RAM stick, making sure that the latches on the side are open. Then push down until you hear a locking sound, meaning the latches engage the RAM. But be careful, do not be too forceful or you might break your MB or RAM.
Step 8: Install Graphics Card
The graphics card is located at the bottom most accessory card slot on your motherboard. It’s usually quite long,usually blue in colour, and runs parallel to the bottom of your PC case.
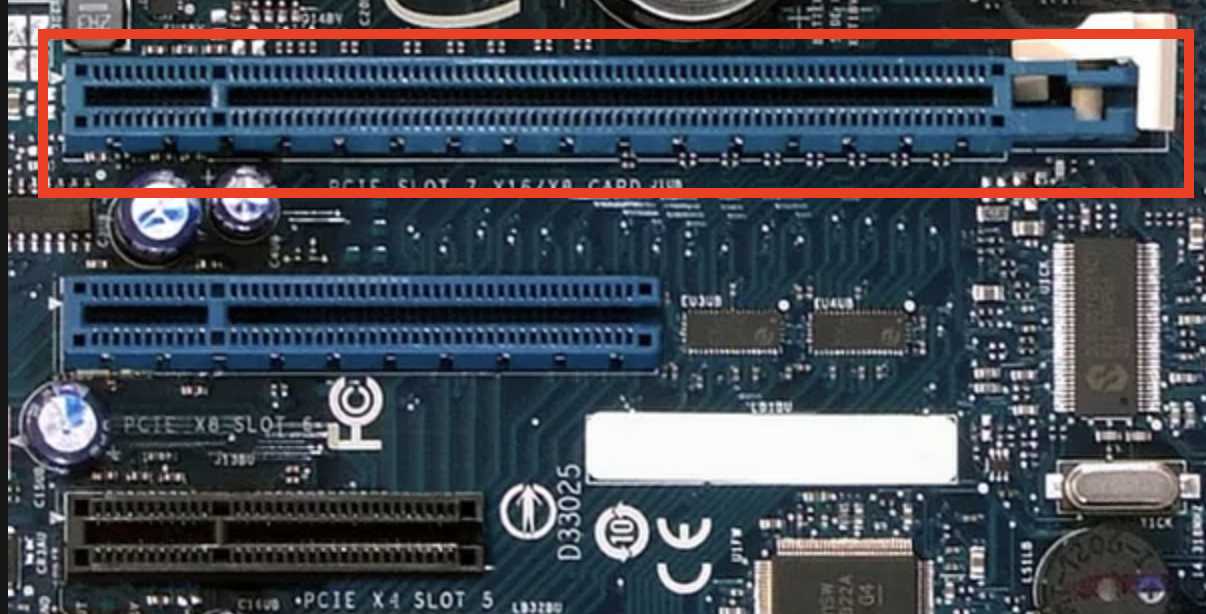
For what we’re using right now, it’s an PCI Express x16 socket. Therefore, we can only use a modern video card. This is something that you should check too to avoid incompatibility problems.
Gently align your video card with the clot touching almost the back side of your computer case. Firmly, but gently, press down until you can feel that the card is fully inserted in the socket. You should hear a click when it’s placed correctly. Tighten the placement by screwing the back panel of the graphics card into into the case. This will make sure that the video card won’t move if the CPU is shaken. Just like with RAM, excessive force might break your video card.
Step 9: Connect the necessary power switches and lights
Remember that every part of the computer that we are working on right now will be different to what you work on. That’s why it’s important to manually check if all the connectors are properly placed.
After you’re done double checking your work, gently slide the connectors inside. Be careful not to break any pin or connection because it will make your whole motherboard useless.
Step 10: Install IDE and SATA Cables
Don’t worry about the order of how to connect the cables. It’s not important so long as you connected them correctly.
To illustrate, DVD Drive uses an SATA cable connection. Install one end into the Motherboards case where the SATA slots are located. Then carefully slot the other end of the cable on the SATA slot on the DVD drive.
Take care as SATA slot pins are very fragile and can snap off very easily.
Follow the same connection procedure when connecting the cable for your HD.
Step 11: Connect Power Supply
When connecting the power supply, make sure that everything is unplugged and switched off first. This is to avoid an accident that might happen in case you made a mistake in securing your connections.
The first thing that you have to connect is the power source of the motherboard. Be careful when aligning the socket and when pressing it so it will connect properly. Most of your parts are a bit fragile and they break easily if you use excessive force.
The same process must be done for your other parts such as your hard drive and video card.
Use the same process in powering up your DVD drive. It might be a bit complicated because once you have attached the power source, you also have to secure the cables at the back by screwing it tightly in place.
Lastly, when you are sure that every single part is connected to the motherboard and to the power source, it’s time to connect your whole CPU to its power source. Most PC might need another adaptor to take care of the sudden jolt of electricity and the massive energy required to run a computer with a high spec.
Normally, the cooling fan is already attached to a case so you won’t have a problem attaching it.
In Conclusion
Building a PC using used parts is a good idea if you have a good understanding of the components of computers. You might be tempted to use random parts with higher specs to meet your requirement. But remember, all your parts should be compatible with each other. For example, most motherboards have a maximum amount RAM that you can install. So if you are not sure, there are many resources online that you can read. Or ask the experts in stores to guide you.
But if you already have the confidence to build the PC yourself, using spare parts is not only cost-efficient, but also exciting. The thrill of achieving your dream specs so you can enjoy gaming, or whatever you do with your pc, is an amazing feeling. Soon enough, after your first build, once you get the hang of it, you’ll be building more.
Related Questions:
Is playing games a waste of time?
Definitely not. Gaming is a way to have fun and entertain yourself. It is also a good way to connect to like-minded people. For some, they use gaming to improve their critical thinking skills.
Can I earn money playing games?
Yes, a professional gamer earns up to $15,000 per month. That is, if you’re on top of your game. You can also have other careers in gaming like streamer, commentator, or guide creator. Alternatively, in some games, you can sell in-game items.
What are the side effects of gaming?
Gaming addiction is very real. You should still balance your normal life. If you are gaming for too long, make sure to have some physical activities so you still get to stretch your bones and muscles.