
The vents on my Nintendo Switch are gunked up full of dust and the poor little thing is starting to overheat.
And, confessions time, I’ve only got myself to blame.
In my house, when undocked the Switch is passed around from one Cheeto dusted hand to another. And when docked, it sits on the floor greedily sucking in the dirtiest detritus a modern home can serve up
I had to take action before my beloved handheld had a meltdown. Then it occurred to me: I can’t be the only person with this problem.
After all, there are millions of Nintendo Switches around the world right now, puffing and wheezing away with blocked-up Vents.
So, duty-bound to help you and myself save our Switches, I pulled out my best laptop, my only laptop for that matter, and started searching for an answer.
This is what I found.
How do I clean the Nintendo Switch Air Vents? You can clean the air vents using a combination of a can of compressed air and a vacuum cleaner. Also, you can clean baked-on dust on the outside of your Nintendo Switch’s air vents by using a damp Q-tip and an anti-static brush.
But, before you go blasting your Switch’s vents with high-velocity air, read on because you can actually do a little damage if you don’t do it right….
Why is the Switch’s air vent important?

The vents are important because they help to keep the Nintendo Switch cool whilst you game.
The Switch has two main methods of cooling: passive cooling and air cooling.
Passive cooling is when the heat generated by the Switch’s components radiates away from the CPU/GPU through the metal and plastic body of the Switch’s case. This heat is then wicked away from your clasped hands and the circulating air. You may have noticed in the past, while playing in handheld mode, the Switches screen and back get’s a little hot. This is passive cooling in action.
In contrast, active cooling is when air is actively pulled into the system by a mechanism such as a fan.
Cool air is pulled into the system through the rear vents. This cool air then passes over a cooling block made up of many thin aluminum fins. This cooling block is heated by the CPU/GPU. As the air rushing air passed over the cooling block it wicks away some of the heat. The hot air is then pumped out of the top of the Switch.
If the air can’t move freely because of accumulated dust, the console can overheat and shut down.
Also, keeping the air vent clear of dust will help keep the temperature of your Nintendo Switch low which will increase the lifespan of your console.
How does the air vent get clogged?

The Nintendo Switch’s air vents get clogged by general, day-to-day, dust and crud including:
- Dust and other things floating in the air
- Dust sucked off the floor if your Switch is near the floor
- General grime falling into the Switches top air vents
Dust usually get’s attracted to the metal inside the Switch because the metal holds a static charge and the dust holds the opposite charge. The dust is sucked in by the fan and then, due to opposing charges, sticks to the metal. This stuck dust inherits the metal’s charge. This then attracts even more dust to stick on top of the dust already on the metal.
How to tell if your Switch’s Vents needs cleaning?
You can tell if your Switch’s vent needs cleaning because:
- The console will feel hotter than usual when in hand
- The fan is constantly running
- The fan is running at a higher speed and making a lot more noise than usual
- There is dust visible on the outside/inside of the vent
How to clean the Nintendo Switch air vent
The following method will help you clean about 95% of the dust that’s been sucked inside your Nintendo Switch.
What you’ll need
You’ll need the following tool/materials before you start:
- A can of compressed air
- Your household vacuum cleaner or a low-powered hand vacuum cleaner (I’ve added a link to the one I use. It’s designed for small jobs like cleaning out PC and console cases
- Anti Static brush
- Q-tips
- lint-free cloth
- Cotton shower Towel
- Water
Warnings before we start
Here are a few warnings to keep in mind before we start:
- Don’t use a lot of water. Water kills electronics. When I say use a damp Q-tip, I mean damp, not wet
- Turn off the switch before you clean it. Spraying anything into the Switch while it’s on can damage the fan
- Only spray compressed air into the rear bottom vents on the back of the console. This will prevent the fan from spinning in the wrong direction
- Don’t spray compressed air into the front grills. These are the Switch’s speakers and spraying compressed air into them can damage them
- Don’t squirt the compressed air into the vents for too long because this will cause the fan to turn too fast and could damage its motor
- Do not use alcohol or chemical-based cleaners. They have been known to discolor or warp the Switch’s plastic out shell.
The Method
1: Disconnect your Switch completely from all wires, dock, and controllers.
2: Take the towel and unfold it onto the table/floor you are working on.
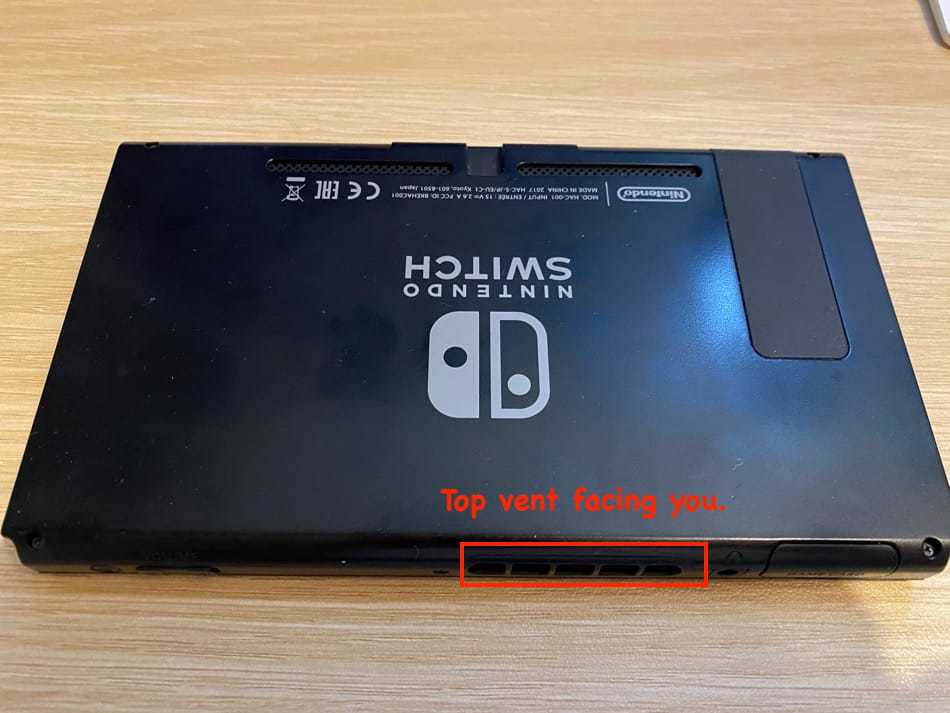
3: Next, turn the Switch so its screen is facing screen down onto the towel with the Nintendo logo on the back the correct way up. You should notice the two rear air vents located close to the bottom of the Switch.

4: Take a q-tip and moisten it with water. Squeeze as much water out of the Q-tip as possible with your thumb and finger.
5: Gently rub the Q-tip around the air vent grills. Do not press too hard as the vents can collapse inwards. Clean away any dust that is stuck in the corners and edges of the air vent. If your Q-tip gets gunked up, swap to another Q-tip and continue.

6: Take an anti-static brush and gently brush over the air intake just to remove any excess dust particles.
7: Take your Switch in hand and turn it so that you can see the top of it: the side where you insert game cards. You should see a large vent with what looks like plates of metal inside. This is the exhaust vent. The plates are the cooling block for the Switch’s CPU/GPU.
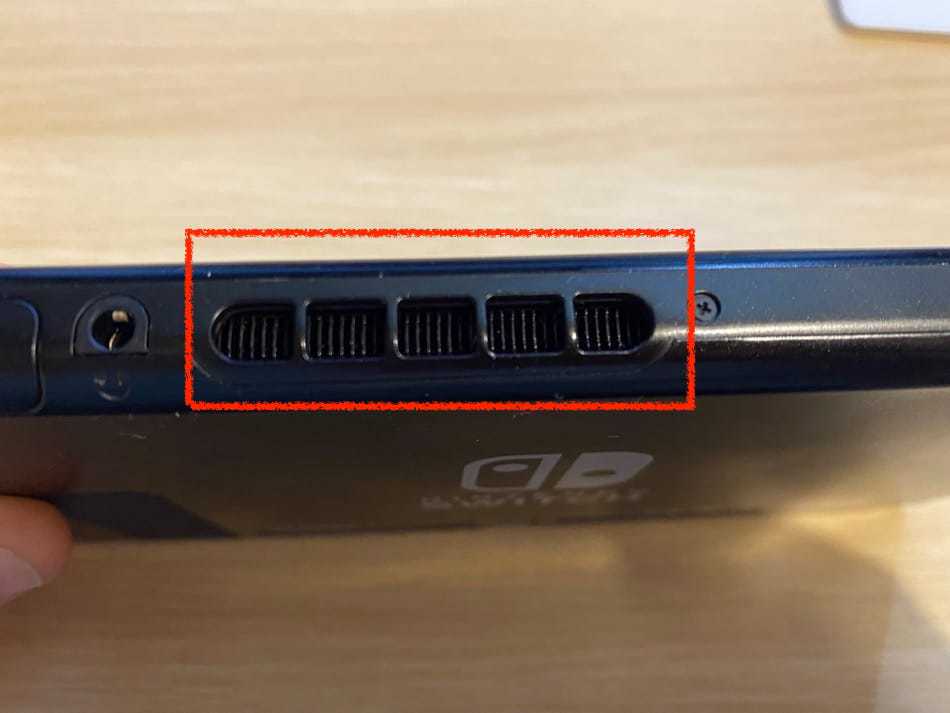
8: Take your anti-static brush that has the longest bristles and poke gently into the vent. Move it up and down the vent’s short axis, then lift it out of the vent. Do this for the entire length of the vent.

9: Take the Switch in hand again and turn it upside down so the vent you were just working on is facing down. Give the Switch a gentle tape to make any dislodged dust or particles fall out of the vent.
10: Turn the Switch so you can see the top vent. Take another Q-tip, wet it, and squeeze excess water out of it. Now gently clean around the vent to clean away any dust that may have accumulated.
11: Face the switch Screen down with the rear Nintendo Switch Logo upside down. The rear vents should be at the top, away from you.
12: Turn on your vacuum cleaner and keep it handy next to you.
13: Take the can of compressed air and place the end of the nozzle facing into the left rear vent. Keep the nozzle fairly close to the rear vent but not touching.
14: Grab the vacuum cleaner and place it in front of the top vent grill. This top vent should now be facing you.
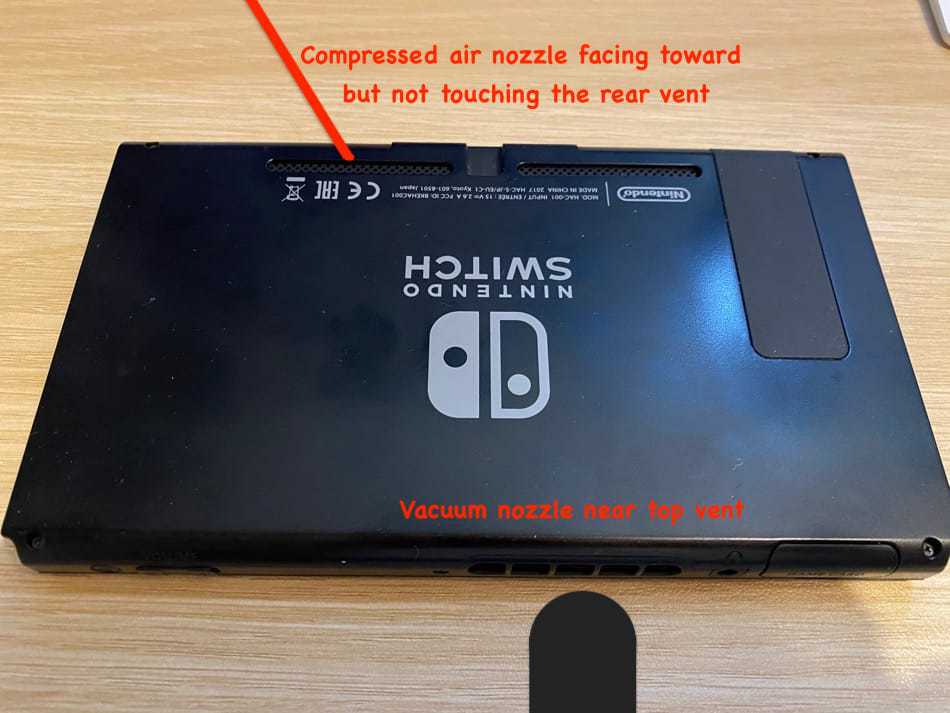
15: With the vacuum switched on, give the compressed air a quick squirt. The pulse of air should dislodge any dust in the system and the vacuum should suck it all out in the correct direction. Repeat this 3 times. Extra squirts of the compressed air won’t help remove more dust.
16: Repeat for the rear right vent. Again, squirt the compressed air three times.
17: Turn off your vacuum cleaner.
18: Some dust particles may remain on the Switch so take a lint-free cloth and wipe the Switch’s vents down.
You’ve now finished cleaning your Switch’s air vents.
How to prevent the Switch’s air vents from getting clogged in the future

You can prevent dust clogging up your Switch’s air vents by:
- Making sure the console is located in a well-ventilated area
- Making sure the Switch has 4-5 inches of space on every side of it.
- Avoid using the Switch in dusty areas
- Don’t use the Switch in an area where people Smoke
- Avoid using air fresheners around the console as this can make the surfaces inside the Switch takky which helps dust stick
- Avoid using a console near pets if you can
- Avoid using the Switch in dusty environments such as beaches or construction sites
- But most importantly, regularly inspect the vents, give them a wipe, and give them a quick single squirt of compressed air
Conclusion
Hopefully, by now, your Switch’s air vents are looking shiny and new, as if you just popped the console out of its wrapper for the first time.
I always like to finish off an article with a quick summary of all the key points. Here’s the main point from this article:
- Air vents keep the console cool
- If vents are not kept clean and dust-free the console can overheat and shut down
- This can dramatically decrease your console’s lifespan
- The best way to clean them is with compressed air and a vacuum cleaner. See the method above
- You can prevent the vents from getting dusty in the first place by
- Maintaining the air vents: squirt compressed air into them once a month.
- By keeping your Switch away from dusty environments such as the floor, near pets, smoke, and outdoor environment that have a lot of dust such as building sights
- Don’t use alcohol or other chemicals to clean the Switch as these can damage the Switch’s plastic outer case
If you have any further questions about the Switch please leave a comment down below, and I’ll do m best to write an article to answer them. And thankfully, despite what the comments section says, you don’t have to input your email address to comment.
What Next?
My fan is still making a lot of noise, is it broken? If the fan is making a lot of noise, the fan may be damaged slightly, and or there may be an obstruction. If the above method does not fix the problem, I recommend sending your Switch back to Nintendo to be fixed.
How do I clean my Switch’s screen? Use a damp cloth to clean your Switch’s screen. Do not use alcohol wipes or screen cleaners as these have been known to discolor and warp the Switch’s plastic outer shell.