
People want to see you react when you stream.
In order for your audience to react to you, they need to see you. Unless your gaming skills are so ‘godlike’ that you have a halo over your head projecting natural light, you’ll have to rely on good old-fashioned lights to correctly light yourself when streaming.
But that raises a good question:
But, how do you correctly light yourself when streaming?
- Make sure your face isn’t too bright, which will make your face look flat – you are not a cartoon.
- The goal is not to eliminate all shadows, eyeshadows add depth and complexity to the face. You need to eliminate hard shadows, so you don’t look like a noir detective.
- Put lights at different angles to add depth.
- Make yourself pop and stand out with a backlight.
- Make sure your green screen it’s not too close to you. Or the light will bounce off the greenscreen giving your skin a green “Hulk” tinge.
Level up your skills as a producer and not just as a gamer. You need to consider aspects such as sound, lighting, and composition.
As a streamer, you are the designer, the editor, and the sound engineer, the gamer, and that fella stuck in the gantry messing with the lighting.
No matter where you are on your streaming journey I’ve designed a selection of lighting solutions for you.
First, we have a simple one light beginner setup. Then I’ll introduce you to an intermediate two-light setup. Finally, I’ll show you how the pros do it with an advanced three-light plus set up.
I’ve even thrown in some tips to help you set up lighting when using a green screen.
Ok, let’s get started…
How to correctly light yourself when streaming: Beginner single light set up

There really is no excuse for having bad lighting when streaming.
Due to the ‘march of progress,’ studio equipment has become cheaper and more accessible, this includes lighting equipment.
Lighting is important because it enables your audience to emotionally invest in you as you stream. Your face is the key to audience engagement.
Your main light is called the ‘Key Light’ and if you can only afford one light then it is going to have to do all the heavy lifting. This could be a simple desk lamp to a professional LED light, or even your mobile phone.
For one light you should position it off to the side. Try not to have the light directly in front of you because this will “flatten” your face by removing all the shadows.
This happens because there is no shadow information. A lack of shadows can make it hard for your audience to read your expressions. If they do read your expressions most of the subtlety will be lost.
But we can produce this depth of information that diffuse shadows create by using a single light.
Simply place the light in front of you. Now, move the light so it’s 45 degrees either to the left right of you. You raise the light a little, but don’t raise it too much as it will create harsh shadows cast under your nose and eyebrows.
But this introduces a new problem:
Harsh shadows.
You want to diffuse shadows: shadows that don’t have hard edges.
Fortunately, there are some tricks you can use to dilute and scatter the incoming light to create softer shadows.
You could place a sheet of diffuse plastic in front of the light. This will scatter the light making it less intense. This will give the light a more natural look.
Light bulb color is another simple factor that can make a big difference. Shops will sell a daylight light color as well as a more yellow light which is traditionally used in homes. The daylight light could give you a natural color. Experiment with what’s right for your setup until you can afford a more professional light with color-changing capabilities.
If you are using your phone’s light, then make sure it has enough charge. You could even use a tripod or a boom arm to help you get the light in the right place.
Don’t make the light too bright, you’re not being interrogated.
One light isn’t going to give you a Hollywood blockbuster-style effect but if positioned correctly will give you a consistent light. So you don’t have to rely on the weather outside your window for good lighting.
For the keylight, I recommend buying a basic ring light such as this one. They are relatively cheap but produce fantastic results given the price point, plus if you click on the link you’ll see over 1000 5-star reviews for the product.
How to correctly light yourself when streaming: Intermediate two light set up
The stage is to use multiple lights to correctly light yourself when streaming. So you have either get reasonably good results with one light or you’ve jumped straight into the two light setup.
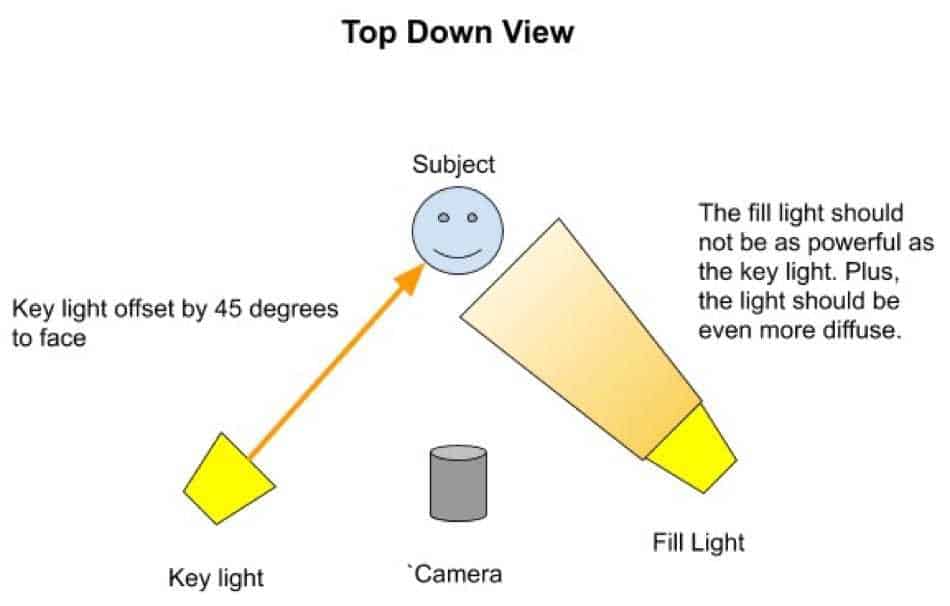
Either way, you need to make sure you understand your lights. One light should be designated as your main light or your ‘key light’. It is the Key Lights job to be your strongest light in your scene. It will most likely have the best set of features like colour changing or dimmable. The key light is still going to be doing the heavy lifting but this time it will have help.
The key light is positioned off to the side, say 45 degrees to the side, and lights the majority of the face. (see the picture below) This image is fine if it was just a photo.
We need to reduce the contrast on the face and eliminate some shadows.

Introducing the fill light.
The goal of your fill light is to soften those shadows while still keeping some definition on the face.
The fill light will need to have a good set of features that include the ability to dim the light. This means you don’t have to move the light too far away or have to filter the light to diffuse it.
The ability to change the colour of the secondary light can help to warm up the light hitting the face to help bring back some colour to the face. This is not a requirement. This luxury can save you from having to use coloured plastic sheets to change the colour of the light.
The light given out from a minor can make you look pale and ill. That is not the Impression you want to give your audience, you want to come across as warm and exciting.
Your fill light will need to be positioned on the opposite side when compared to the key light. Imagine yourself sitting at your workstation. You should have your key light at 45 degrees on your right or left. While on the opposite side 45 degrees you’ll have your fill light.
The fill light should not be very strong. Use the dimmable features if you have them and just have it bright enough to eliminate the strong shadows. Again don’t try and make your face over-lit. You need to be able to comfortably sit at your workstation without having to squint to see on the monitor. Subtlety is the key.
Everybody’s environment is going to be a little bit different. depending upon the shape of the room and even the colour as light will bounce around the room. The time of day will also affect your setup.
Test out what works best for you. As with everything, make small incremental improvements to your setup as often as possible.
When setting up your light make sure your monitor is on! Your monitor gives out light and can affect your lighting setup.
You could look into buying a light bundle. Which could give you more options, when it comes to color and temperature changes. Most light bundles will give you LED lights and tripods or stands for the lights. The beauty of LED lights is that they can be dimmed while using less electricity. The best thing about them is they give off less heat than a traditional bulb which will help during those long streaming sessions.
I recommend checking out this 2 light bundle. It comes with thousands of 5-star reviews. And for good reason, the lights come on tripods, they are dimmable, and they have different colored sheets of plastic so you can change the mood of the lighting as you see fit. Perfect for the intermediate streamer.
How to correctly light yourself when streaming: Advanced 3 lights and more set up

Now we are getting to the serious side of lighting. This is where you understand that lighting can affect the mood of the stream. Your face can be lit in lots of ways, each telling a different story or expressing a different mood and look. Check out this video to quickly see how the position of one light can make the face look radically different.
At the professional level, you aren’t just setting up the light and leaving them. You are making conscious artistic decisions and positioning the lights strategically.
It helps to think of lighting in terms of a film scene. You need to make sure you are lit as if you are an actor.
Using a 3 point lighting setup will convey to your audience an air of professionalism. This will add more weight to your content. It will help you stand out against the ever growing crowd of new streamers.
To set up, you will use your ‘key light’ and fill lights at roughly 45 degrees angles in front of you on either side. With the key light being your main most powerful light and the fill light being weaker to just remove harsh shadows.
The next step is to use a backlight.
The goal of the backlight to give you pop.
The image below uses red light to make the woman pop out from the background. This is an extreme example. To show that the backlight can create a glow around a subject to make them stand out.

You don’t want to light the back of your room or you will blend into it. You are lighting the subject (you) in such a way that you are brighter than the background. Even if you have white walls behind you.
The backlight should be hidden from view of the camera. This could be off to the side or lower down depending on the look you are going for. If you can see the light in the footage then it will be a focal point and be competing with your face for the audience’s attention.
This is why you need to control the lighting in your environment. Because the wall behind you isn’t directly lit, there will be a good contrast between you and your background.
The backlight is a great light to experiment with by using different colors. Try and pick a color that will pop in relation to the background color. Remember your color theory and use opposite colors to your background to give you the most impact. So if your background contains a lot of yellow, consider using a purple filter in your back light. This will help you create a striking silhouette.
You could make the colours match your channel’s branding, the possibilities are endless.
Using a backlight can make the scene look very artificial. The brain is very good at calculating if images are natural or artificial. Depending on the look you’re going for, you can make it look like a neo nightclub or make it as if you are being lit by natural sunlight. All while streaming anytime day or night.
One trick you can use is from film. Place a small light somewhere in the background, make sure it roughly matches the same colour as the backlight. Then the audience will be happy to suspend their disbelief, even though that light is not lighting the subject.
The last thing you might need to know about are ‘light reflectors’. They are used all the time in professional photography.
They are just big disks of solid color, usually white, but they come in many varieties. They are used to help make the most of the lights you have. They work by giving your lights a big reflective surface to bounce off. You could even use this instead of a second light in some circumstances.
To get you started on the advanced lighting set up, I recommend buying the ring light from the beginner setup, that’ll act as your key light, and the lights from the intermediate setup. Combine them both and you’ll be on to a winner.
Conclusion
After sound, visuals are the most important element when streaming. With lighting being the unsung hero in making a setup look more professional. There are multiple ways you can improve lighting for any budget and any skill level.
Any lighting is better than none, you should aim to control your lighting environment. Especially for long streams, if you are using a window as a light source the lighting will change based on the time of day and the weather.
Add lights at different angles to help add depth to your face.
Remember the goal isn’t to remove all shadows, but to light your face in such a way that you still have some soft shadows. This can help your audience read your face easier.
Experiment with different colours, this could be your secondary light or even your back light.
Don’t stare into the lights, you are not under interrogation in some B-movie. Look after your eyes.
You should be constantly trying to improve your lighting setup. I hope this article has helped to brighten up your day, by showing you that there are always things you can do to improve your set up.
For a beginner lighting setup, check this kit out.
For an intermediate lighting set up, check this kit out.
And for an advanced lighting set up, I recommend buying the ring light from the beginner setup and the two lights from the intermediate setup. Combine them both and you’ll be on to a winner.
What’s Next
Should I use a beauty light when streaming? The main selling point of the beauty light is that you get a beautiful ring of light reflected in your eyes. The downside is that it has to be positioned in front of you in order for the reflections to work correctly. Relying on just one light can make your face look a bit flat. The ring light can be supported with other secondary lights for the best effect. Treat it as any other light, it is part of a tool kit, there is no wrong or right.
How to get rid of glare on my glasses while streaming? Everybody glasses are different but even with the latest anti glare protection glasses won’t remove all the glare on their own. If you move the light higher and more to the side you should find a sweet spot that will lessen glare from your lighting set up. If the glare is coming from your monitor you could consider purchasing an anti glare monitor cover.
How can I remove the green glow around me when using a green screen? The biggest downfall of the green screen is the dreaded green glow. It is almost impossible to completely remove but there are a few things you can do to lessen the effect. The first is move your going screen further away from you. This stops as much of the light bouncing back on to you. This might mean that you need a bigger screen to cover the same area. You could also make sure your lights are not being faced directly in front of the green screen, for the same reason.