
Over the last 5 years of playing Rocket League on my PS4, I learned a lot of sick trick shots.
Even if you’re losing the match, a Rocket League trick shot gets praise from teammates and opponents alike.
Most of these shots occurred when I played solo so I couldn’t show off in front of my friends since I don’t record my PS4 gameplay.
Frankly, I didn’t even know that recording gameplay on the PS4 is possible.
It was only when my online buddy recommended that I start recording my gameplay and uploading it on YouTube that I got the idea that PS4 gameplay recording was possible.
I mean… showing off in front of friends is cool and all, but why not immortalize it by uploading it on one of the most popular social media platforms on Earth?
I started my research and this is what I found out:
How to record PS4 gameplay for YouTube? You can record PS4 gameplay for YouTube by using the ‘Share’ button > Saving the gameplay video > Uploading it on YouTube, or if you require higher resolutions, more functionalities, and unlimited recording time, you can use a capture card to record your gameplay on the PS4.
Recording and uploading gameplay on the PS4 is not rocket science. It might seem difficult but once you get the hang of it, it’s pretty simple.
There are two methods of recording and uploading your gameplay on YouTube;
Without Capture Card and With Capture Card.
Let’s get into the detail of recording PS4 and PS4 gameplay without a capture card.
How To Record PS4 Gameplay For YouTube Without Capture Card?
Recording PS4 gameplay without a capture card means using the built-in ‘Share’ feature of gameplay recording in the PS4. It is a great way to record PS4 and PS4 Pro gameplay for gamers who are just starting their YouTube channel.
Here’s how to do it:
1. Get to the point in the game where you want to start recording.
2. Press the ‘Share’ button on your PS4 controller and a menu will be displayed.
3. Here you can select if you wish to broadcast your gameplay or simply record it.
4. The PS4 is in a continuous 15-minute recording loop. So, you can include 15 minutes of past footage after pressing the ‘Share’ button.
5. After you’re done, simply press the ‘Share’ button again to save your recorded gameplay on a USB stick or upload it on Facebook, Twitch, or YouTube.
Although simple, this method of recording PS4 gameplay is accompanied by a few cons as well. Such as:
· You will need to purchase a Playstation plus membership if you want to utilize the ‘Share Play’ feature of sharing your recorded gameplay footage. (Source)
So, this method is not entirely free.
· You are restricted to 1080p30 on PS4 Pro and 720p30 on the PS4 recordings.
· You cannot record for more than 60 minutes.
· There are very limited editing options on ‘Sharefactory’.
While these limitations might be tolerable for a new streamer to gather a small audience… a professional streamer with a lot of subscribers cannot hope to grow by uploading low resolution/FPS gameplay recordings on their channel.
So, how to overcome these obstacles? Simple! Use a capture card to record YouTube gameplay.
Before I proceed to explain the capture card gameplay recording method on the PS4 and PS4 Pro in detail, let’s check out what a capture card is and how does it function?
What Is A Capture Card?
A Screen Capture Card is a device that relays video information from an HDMI output and converts video information from raw footage to a format which streaming platforms like YouTube and Twitch can read.
If you are looking to record your screen on consoles like PS4, Xbox One S, Nintendo Switch, etc, then you’ll need a capture card.
If you are looking to record gameplay on your Nintendo Switch, then take a look at this guide!
A capture card is a compact device that packs a big punch! – Letting you record and stream in your console’s native resolution.
While current-gen and next-gen consoles are equipped with built-in screen recording features, are they enough for streaming content on a YouTube channel?
You’ll find it out below in the comparison table.
PC gamers don’t require a capture card to record or stream their gameplay to YouTube.
While it is a necessity for console gamers who want to become professional streamers on YouTube. Let’s check out the functionality of a capture card.
How Does A Capture Card Function?
A capture card might be a compact device, but it is really powerful.
It can live stream gameplay up to 4K @ 60FPS which is a massive resolution to handle!
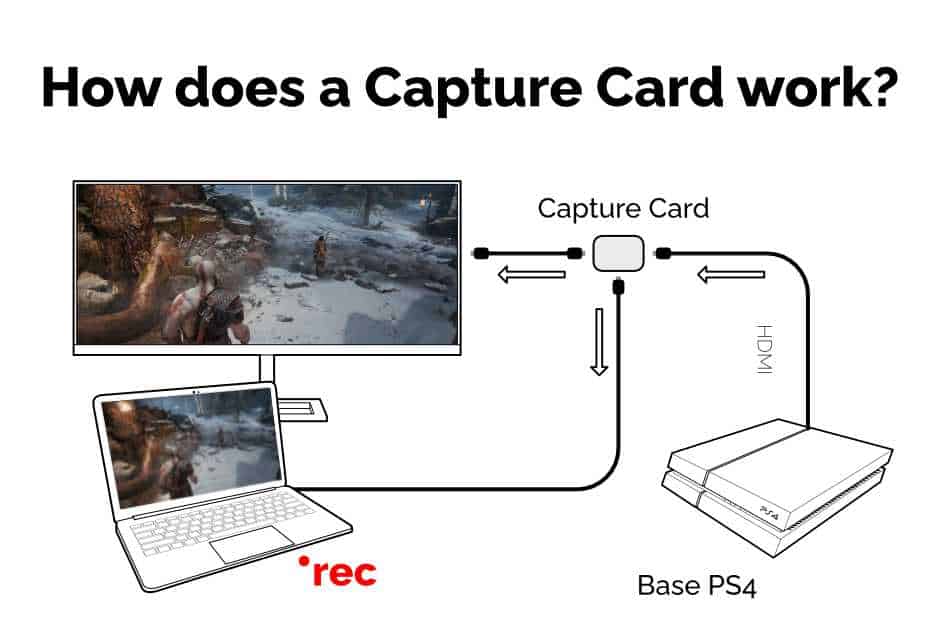
Mostly, capture cards receive video information through the HDMI from your gaming system and relay it on a monitor or TV.
Next, the capture card connects to a PC through a USB thunderbolt cable or through a PCIe port (depending on the capture card you buy).
Additionally, some capture cards allow you to connect a mic and webcam too!
This feature is incredibly useful for streamers who want to stream their gameplay with commentary or wish to stream their reaction through a webcam along with gameplay!
Usually, a capture card gets video input through your console, relays it to a monitor so you can watch your gameplay, and connects to a PC to record the screen through a capture software.
You can choose to either record the PS4/PS4 Pro gameplay or directly stream it to YouTube.
The recorded gameplay is stored on the PC’s hard drive, which is much more convenient than saving it on the console.
Rarely, capture cards are capable of directly recording your gameplay to YouTube without the need of a PC. The Elgato 4K60S+ is one such capture card that saves your PS4 on an SD card that you insert in the SD card slot on the capture card.
Such a capture card can only record gameplay and store it on an SD card. This means you will need to purchase a PC-requiring capture card if you wish to live stream your content.
Keep reading on and I’ll recommend a capture card that will be a perfect fit for you!
Which Capture Card Should You Buy?
When you look into the capture card market, you’ll notice there are many different capture cards to record and stream your gameplay.
But which one is the best?
If you ever have had the opportunity to read a forum thread on capture cards or read a guide regarding capture cards, you will know that one brand stands out amongst the rest.
You guessed it… it’s Elgato.
Elgato is one of the leading brands of capture cards that a lot of streamers recommend.
Although a bit pricey compared to other brands – Elgato capture cards provide their money’s worth in terms of performance and durability.
The Elgato HD60 S+ is an extremely popular capture card for gameplay recording and live streaming.
Many YouTubers use this capture card and recommend it to other fellow streamers.
The Elgato HD60 S supports 480p30 all the way to 1080p60 which is a pretty decent resolution and FPS range. Plus, it has a 4k HDR pass through to your TV, so you can still play those Playstation Pro games at full resolution with HDR colors enabled.
Although possible, 4K streaming and uploading are not that popular. I guess we can all agree that watching a video on 1080p60 is ideal.
Now that you know what a capture card is, and which one to buy. Let’s check out the requirements of recording gameplay from a capture card on your PS4/PS4.
How To Setup And Use A Capture Card With A PS4 And PC?
PS4 game capture cards come with either a PCI-e interface or a USB interface.
When making the choice of purchasing a screen capture card for recording your PS4 and PS4 Pro gameplay – You need to decide whether you want to purchase a capture card with a USB interface or a PCI-e interface.
USB external capture cards are more flexible since they can be taken with you. PCI-e capture cards, on the other hand, do not have the bandwidth constraints that USB external capture cards have.
Here are the requirements of recording PS4 and PS4 Pro gameplay through a screen capture card:
· Your console: PS4 or PS4 Pro.
· Capture Card: I recommend Elgato HD60 S+ which is optimum for a PS4 streamer.
· A PC with Windows, Mac, or Linux OS.
· Two HDMI cords – For HDMI-in and HDMI-out on the capture card
· A 3.0 USB cable or PCI-e slot in your CPU (Depending on which interface capture card you want to buy)
· A Passthrough Device: A monitor or TV with HDMI support.
· Screen Recording Software for your PC: Elgato capture software works great with Elgato capture cards in Windows and MAC operating system PCs.
If you are a Linux user, you can download OBS screen recorder.
These are the requirements for recording gameplay on a PS4 to upload it to YouTube.
Once you tick every box on the requirement list, you are ready to start uploading your gameplay videos on YouTube.
Continue reading to find out how to record PS4 and PS4 gameplay for YouTube using a capture card.
How To Record PS4 Gameplay For YouTube With A Capture Card?
A capture card transmits video information from your PS4, PS4 Pro, or any system that utilizes an HDMI port to a PC from where it’s recorded through screen recording software.
A capture card, at its most basic, does two tasks:
· It sends a video stream to a PC for processing,
· And supports passthrough, which allows the video signal to be seen on your TV at the same time.
The method of transferring the video stream to a PC is significant because many external devices need a sort of ‘middle man’ to transform the raw video stream coming from your PS4/PS4 Pro into something that the PC can read.
Once the video is on the PC, it is encoded and may be saved as a media file, posted live to YouTube, or both.
Meanwhile, the passthrough allows you to watch the game on a display while the PC records it.
Most capture cards are available in two basic configurations: an external USB device that connects to the PC via USB or an interior PCIe expansion card. You’ll need an accessible PCIe slot on your desktop PC’s motherboard for the latter.
The simplest configuration is transmitting the video signal from the console or an external device to the capture card via HDMI. The signal is then sent to the display through an HDMI output on the capture card. A USB wire links external cards to the PC, but an internal capture card using PCIe already has a connection to the PC.
While most of the procedure for using a capture card with either a USB interface and PCI-e interface is pretty much the same, there is a slight difference during the setting up process. Let’s take a look:
How To Setup A Capture Card With USB Interface?
USB interface capture cards are the most commonly used capture cards. They are versatile and can be easily taken on-the-go. Whereas a PCI-e interface capture card needs a PCI-e slot inside the CPU, so there’s not much portability.
Here’s how you can set up a USB interface Capture card:
- Connect your PS4/PS4 pro to the capture card through HDMI.
- Plug-in the HDMI from the PS4 to the HDMI-in port on the capture card.
- Connect your passthrough device (TV or monitor) with the capture card through the HDMI-out port of the capture card.
- Since we’re talking about a capture card with USB interface – Connect your capture card to your PC with a USB 3.0 cable.
- Download and install Elgato capture software on your computer.
- Start the software and follow the on screen instructions to set up your card.
- You should see your PS4’s screen mirrored onto your PC.
- You can now start capturing footage.
Wasn’t that easy? Let’s take a look at how setting up a PCI-e interface capture card is any different.
How To Setup A Capture Card With PCI-e Interface?
1. Slide your PU case off to expose your computer’s motherboard.
2. Look for a vacant PCI-e port on the motherboard of your PC.
3. Gently slide your capture card PCI-e pins in the PCI-e slot. (How to install a PCI or PCI-Express expansion card - YouTube)
4. Start connecting the HDMI cables in the same way as you did with the USB interface capture card. (i.e., HDMI-in with your PS4/PS4 Pro and HDMI-out with your display medium)
5. Turn your console and PC on and start your gameplay streaming through Elgato capture software.
Caution: Always make sure that your computer and console are switched off and unplugged when you attempt to set up your capture card.
Also, make sure to insulate yourself when electrical components are concerned to avoid electrocution.
The PS4 relays video information to your monitor and your PC (through the capture card) while the screen recording software records the entire display.
This means that you can not only record and live stream gameplay on your PS4/PS4 Pro.
But you can record tutorials, tips & tricks, and setting tweaks by recording your complete dashboard for your subscribers.
Now that you are aware of recording PS4 gameplay for YouTube with a capture card and without.
Let’s do a comparison so you can evaluate which method works out the best for you.
What are the advantages/disadvantages of using a capture card vs without capture card video capture on PS4?
If you want to record your gameplay on the PS4 and PS4 Pro for YouTube, then you have two options; With and Without Capture Card gameplay recording.
Both methods of recording gameplay on the PS4 and PS4 Pro are pretty straightforward. Let’s jump right into a comparison table between PS4 gameplay recording for YouTube, with and without a capture card.
| Recording PS4 Gameplay Without Capture Card | Recording PS4 Gameplay With Capture Card |
| Recording gameplay without a capture card is very easy. Simply press the ‘Share’ button twice and start your gameplay recording. | You will need to set up a capture card with your console before starting to record and stream your gameplay. |
| The PS4 is constantly in a 15-minute recording loop. So, anytime you start recording a gameplay video, you can include the past 15 minutes of gameplay as well. | Recording starts when you start the screen recorder. |
| Gameplay recording is limited to 720p30 on PS4 and 1080p30 on the PS4 Pro | You can record up to 4k60p with a capture card (4K is supported by PS4 Pro, source) |
| Only 60 minutes of recording time | Video recording time is only limited by storage in your PC. |
| Very limited editing options. | You have the freedom to edit your gameplay recording with software like Adobe Premiere Pro, Wondershare Filmora, etc. |
| You will need to purchase a PlayStation Plus membership to send or view ‘Share Play’ gameplay videos. | You will not need to pay additional to share or view your gameplay footage recorded by a capture card. |
| No PC is required. | You will need a PC to record and live stream PS4 and PS4 gameplay videos to YouTube. |
| You can only record gameplay with the ‘Share’ button. | You can record the whole screen which is extremely useful if you want to share PlayStation dashboard recording or system settings tweaks. |
| Your gameplay recording will be triple compressed which means lower bitrates. | The gameplay footage will be captured in RAW format with higher bitrates. |