Update: This article has been updated for 2023. I have included a new section on Common 3D platform Level design pitfalls. Enjoy!
By designing levels for a 3d platformer game, you are about to inspire the next generation of children and adults alike. The ‘3d platformer’ is a beloved genre. Just as you no doubt have memories of Mario first walking around Princess Peach’s castle in Super Mario 64. You have the chance to make history once again.
Exciting times lay ahead, as level design is one of the most important parts for making any game. You are about to embark on a 3d platformer adventure.
It’s no exaggeration to say that…
Level design will make or break your 3d platformer game.
The difference between a good game and a great game is in the details. Understanding the game you are designing for and planning out your road map. You should be living and breathing level design, be thinking about it constantly so it even invades your dreams.
If you think there isn’t much to occupy your time, then I’m about to start unraveling this ball of yarn until we get to the center.
You will learn tips and tricks to help your level stand up next to gaming legends like, ‘Super Mario 64’ or ‘Banjo and Kazooie’.
It is called level ‘design’ for a reason. So put your design hats on and dive into this article to learn to think like a 3d platformer level design master.

Image from ‘The Art of Super Mario Odyssey’
Understanding Your Toolbox
The first thing you have to do is to understand the skill set of your hero character(s).
I can’t emphasize this enough.
How does the character feel to move?
Jump? Attack? How does it feel to string different types of movements together?
All good games in this genre will have a unique selling point (USP). It is normally something that the hero can do, that no other character can do. In other worlds.
What makes your character special?
Sonic can run as fast as a bullet and spin ball attack into enemies. In Super Mario Odyssey, Mario frisbees his hat to use as a jumping platform or to stun enemies. And these unique abilities completely change the level design.
Understanding your heroes abilities and how they work together will inform and direct your level design.
The hero character, or the player character, is only one element in your toolbox of goodies.
And believe me, you’ll need to utilise every goodie you can find in this particularly daunting sandbox.
From game items such as special powers, to different types of enemy designs and attack patterns, you’ll need to pull every idea together to challenge the player and keep them engaged. Consider, for example, each type of platform the character can move on. From the classic moving platforms to the more exotic types, platforms alone constitute a massive area of level design.
Think of your levels as a showcase for the player’s unique skill set.
Most games will have at least one test environment. This is somewhere you can test out the games toolbox of ideas.
‘Yooka - Laylee’ by ‘Playtonic Games’ released what they called a ‘toybox area’ which is a testing area. This is where the game designer and programs can test out their creations. This isn’t something that players usually get to see or play. Being a Kickstarter game the team at ‘Playtonic Games’ released it as a proof-of-concept to show people how the game actually worked. If you watch the video, you‘ll notice that most of the world is just plain geometry.
As a level designer, you should spend a lot of time playing and testing in this type of environment before starting to create your levels. You need to know the main character’s skill and movement set limits, so you can push them to those limits using the level design.
If you’d like to learn more about the broader design 3D platform games, check out my 3D platform game Design article. It goes beyond level design and looks at every aspect of 3D platform game design, from sounds, to how blob shadows can help players navigate the world. Honestly, I think it’s a must read.
Hub Worlds
Most modern 3d platformers are designed around ‘hub worlds’. Think Princess Peach’s castle in Super Mario 64. A hub area is normally a safe space where the player can experiment. Game levels then branch off from this main area.
This is one of the most important areas in most 3d platformers, it is more than just a 3d menu select screen.
It needs to feel like a real part of the game world. A place to practice all of the skill moves and characters’ unique ability. And maybe even hold a secret or two!
Remember that this hub will be a space that players will become intimate with as they’ll be revisiting it over and over again.
Design shortcuts into your hub world, even if they are not apparent to beginner players.
When the player has full control of the main hero’s skill set, they will want to feel like the hero.
So design the space with this in mind.
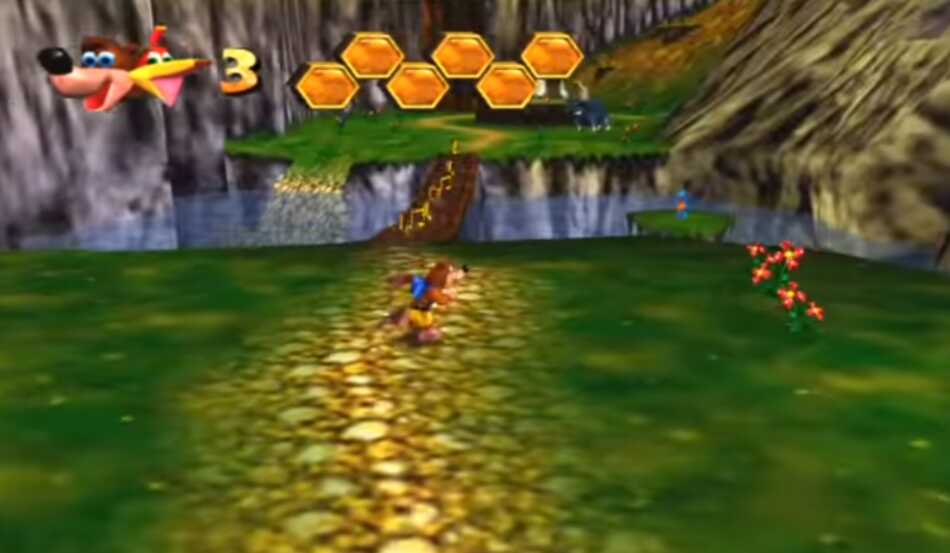
Screenshot from ‘Banjo-Kazooie’
Design short cuts from the main areas of interest in your hub, this will also help with any backtracking the player is required to do.
Super Mario 64 used Stars to gate off levels so that players were progressing through levels, then steadily adding more difficult levels and challenges.
Your game may unlock with a skill set progression system. Meaning the player does not have the tool set at the beginning of the game to reach later levels. In this case players must earn skills by playing levels in a loose order to obtain new abilities to unlock previously unattainable areas.
Almost like a Metroidvania type of game where new abilities open up previously inaccessible areas.
You may not have a linear level unlocking system. Your game might employ a more open strategy, unlocking levels In waves. Level 1-5 might be unlocked at the beginning of your game for example. In that case are the levels all the same difficulty?
This will have a direct effect on how you need to design your levels. In this case you should make sure the levels offer variety in their challenge, so if the player gets stuck on one level they can come back later.
Elevate Your Game Design Skills with Skillshare
Ready to dive headfirst into 3D platform game level design? Look no further than Skillshare’s top-tier course. Think of it as your invincibility star, powering you up with the skills you need to bring your game design dreams to life.
But the journey doesn’t stop there. Skillshare is your personal open-world game, filled with a plethora of other game design and development courses. Every new course is a questline for you to level up your skills.
If you’re serious about your career in game design, Skillshare’s one-year membership is your legendary loot. For just $170, you secure a year’s access to knowledge that rivals any degree or master’s program.
But if that investment feels daunting, then it’s time to ask yourself: are you ready to commit to becoming a 3D platform level designer? Are you really that fussed about learning 3D platform game level design?
Game design is not a casual game, it’s a hardcore run. If you’re serious about it, investing in Skillshare’s membership could be your best move. So gear up, and Sign up for the Skillshare Game Design course now, and start crafting the games of tomorrow, today!
How To Plan The Difficulty Of Each Level Before Starting The Design
Ok, you have a handle on all the game mechanics and how you could potentially use them in creative ways. They are locked down and not going to change.
Now, before you even start designing, you need to map out the difficulty curve of your game.
A lot of first-time designers start by making levels by just doing what they feel is right.
This is one of the biggest traps to fall in.
You might get away with this for a few levels but if you are being tasked with creating levels for a whole game then that’s a different story.
First, you plan, on a spreadsheet, when each and every skill and enemy will be used on every level.
So Making a skill and enemy Spreadsheet is the next thing on your list.
Here’s a basic example of a skill use chart showing what levels specific skills appear.

Why! you ask? You might work on level 5 then level 30, without planning how you are going to understand the challenge that you need to present to the player. How many bad guys should you use on any given level? With a skill chart, you can make sure you are ramping up the difficulty.
You should assign a difficulty to each skill move and enemy. Ideally challenges such as platforms and any special items related to your game should also be included. The more you go into detail the better at this stage.
You can make your table in any spreadsheet software like, Microsofts ‘Excel’ or Google ‘Spreadsheets’. This is a tool for you to track how many times an item or skill move is used.
Each level should have a row on the spreadsheet giving information on how many times a skill or challenge is used on the critical path. That way you should have some idea by just looking at the spreadsheet how difficult a level is.
You should take into account combining skill moves. You might have three easy skills, but combining them is super hard!
Then it’s time to fill out the spreadsheet with how many times a skill will be used on each level. This can be a rough guess at the start. As you design more levels it’s important to keep this sheet updated.
You never know when someone else will join the team. This way they can be assigned a level and they will have a structure to guide them.
This sounds like a restrictive way to design a level. Some designers feel that this is taking away from the creativity of level design. This is the wrong way to think.
It will be liberating.
What’s easier to create from a blank sheet or to have a set of challenges to inspire you.
You won’t have that doubt in the back of your mind: am I doing the right thing? Is this too easy or difficult?
You can focus on using your talents to eke out every bit of fun from all the mechanics. Allowing you to focus on a few things per level or area. Your job is to make the mechanics shine.
Throwing everything at the player at once, is a sign of the inexperienced.
Making Great Levels Through Iteration
Making great levels is all about iteration. You might make the odd one that’s fantastic from the start but even the best designer will iterate their levels to get that extra 10% of fun out of them.
Create. Test. Iterate.
You should be focused on blocking out levels as quickly as you can.
Quick and dirty, with no environmental detail. You are just putting down basic geometry. ‘White-boxing’ your level first.
This will stop you from getting attached to your ideas, the longer you spend on a level the more you will try and force it to work.
Levels get built in stages, detail gets added later.
You need to think of level design as if you are drawing a picture. You start with a quick thumbnail sketches to get the right composition, then out line your image. Only adding colour after your image has passed each stage.
The point being you should explore as many ideas as you can as quickly as you can.
The goal is to fail as quickly as you can so you can find ideas that are fun to play. Because if it’s fun to play when it is boxed out in flat polygons, it’ll be even more fun when all the graphics are in place.
The quicker you fail with an idea, the quicker you can move on to the next idea. There is no point spending half your project’s budgeted time trying to make a level work, when you could have been generating new ideas.

Screen shot from ‘Super Mario Odyssey’
You might design 50 levels for every level that makes it into the game. But this is part of the art process.
Make sure you understand your technical limitations. How many enemies you can have on-screen at once or how big can a level / area be before you have to think of creative solutions, such as hidden loading screens. Every platform you make games on, be it a console or PC, will have limitations placed on the number of assets that can be shown at any one time on screen. So keep that in mind when designing.
The camera system is normally the big downfall for 3d platformers. Even the big hitters like Mario and the Rare classics like Banjo-Kazooie have issues. You need to understand how your game camera will react to different size spaces. This will affect how you can construct levels, to give players the best experience possible.
Level Pacing
What is the goal of the level? This is a two part question.
What is the player’s goal? Are they just trying to clear the stage or beat a boss in an area?
What is the level’s goal? This is different from the player’s goal because you are designing this level within the context of the whole game. Is the level teaching a new mechanic or is it going to be a challenging slalom of pixel perfect jumps.

You have to take into account the games pacing. Where does your level fit in on this chart?
Level pacing is all about creating a model of ‘Tension’ and ‘Release’ in your game. That tension might be your levels and the release might come from your hub area. Having the hub area will allow players to self regulate when they are in the mood for a real challenge.
Levels will build difficulty until a boss or a release point. That might be finishing the final level in a small area or completing a small hub area. It might be something different for your game.
Part of your level design might be to place checkpoints or auto-saving points. This is part of your level! You must take this into consideration when designing the challenge of your level. Even a lot of easy challenges can be made difficult by having to do them consistently without taking a breath.
You should build areas where players can rest, it doesn’t have to be a checkpoint but it will allow them to group the challenges and focus on the next one.
While the above video from Mark Brown is about 2d level design, all of the principles translate into 3d.
You will have a wide variety of players with different backgrounds and abilities. Try adding a little something for all of them. For example, is your game compatible with speedrunners? You could do this by limiting cutscenes or making them skippable.
Adding secondary challenges off the beaten path will give the more experienced player an additional objective. Just make sure the reward matches the risk.
Is your game going to be a collectathon or is each challenge linked to for a story? Knowing how players are going to play your levels will allow you to better design environments.
Players will easily get distracted so try not to have a big baron open world.
Try to make sure there’s always something on the screen that will interest the player. It could be as simple as a hidden cave or an interesting looking ruin. Anything that will make the player say, ‘I will just do one more thing’. Then before you know it, they have gotten lost in your world.
You need to surprise and delight your players.
Teach The Player How To Play Your Game Though Clever Level Design
Game mechanics can be very difficult to teach. The equivalent of exposition in a movie. It’s something that has to be done, but can take valuable time away from the enjoyment.
The goal for you as the level designer is not to overwhelm the player.
Don’t make the player read a wall of text, on how to do basic stuff like ‘jumping’. As funny as you think the dialogue is, players want to play, not read, when playing a platformer.
You need to show not tell.
You need to first introduce mechanics in a safe space. Where the hero character has no risk of dying. Only once they have successfully shown use of the mechanics should you introduce additional challenges. Remember at this point the player is committing these moves to memory. You want the player to be focused on that task. Don’t overwhelm the player at this early stage.
Mark Brown has a fantastic video on the subject see above.
Hub areas are great for letting the players ‘simple play’, hub areas will let the player experiment with player lead objectives. You should design the hub with ‘play’ in mind.
Wayfinding In 3d Platformer Games
There are many techniques you can use to pull the player though the level, the simplest is with your collectibles. Be mindful when placing collectibles. Use them like breadcrumbs and they will pull the player through a level. It will let the player know where they have been. Try and keep them on the main path in logical groupings.
Most 3d platformers will utilise various collectibles. In Mario Odyssey, there’s coins as the lowest currency. With Moons as the top collectable. The coins are the breadcrumbs, if you see a path with coins you know as a player this is an area you haven’t explored yet!
Think about the experience of your collectibles, do they make a sound when collected? If so does it change when you collect a group? Think when Mario collects notes, the sound is an important part of the experience.
Give your collectables purpose. Design ways to use your collectables. That way the game levels will feel consistent. You don’t want one designer throwing them around for fun and a second designer not using them.
Reward your players for exploration, if they see a cool looking path that leads to nowhere, the player will be disappointed. Either remove the path or add a hidden surprise.
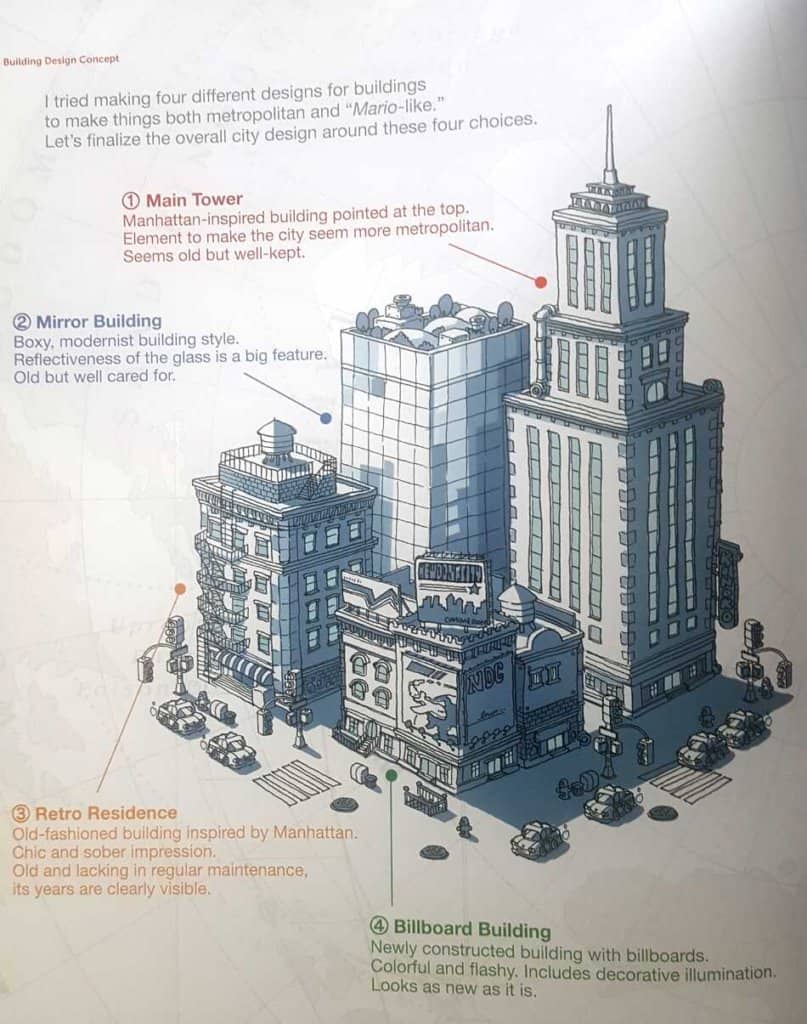
Image from ‘The Art of Super Mario Odyssey’
The landscaping is another tool you can use to tempt players to a location. If you have a mountain, players are going to want to climb it.
Think of spaces like theme parks, where in each direction they look there are big shiny things, secretly whispering ‘come and look at me’.
Create visual interest and the player will follow.
Common Pitfalls in 3D Platformer Design
Hey there, fellow game gurus! If you’ve ever found yourself navigating the labyrinthine world of 3D platformer design, you’ll know it’s a bit like tackling a particularly devious dungeon in The Legend of Zelda - it’s full of hidden traps and pitfalls that can snag the unwary adventurer. So, let’s equip our metaphorical compasses and head out together to uncover some of the common pitfalls in 3D platformer design. Ready? Let’s jump right in!
The “Leap of Faith” Fallacy
First on our list is the infamous “Leap of Faith” - the design equivalent of a Goomba in a dark alley. We’ve all been there, right? Our plucky character is poised at the edge of a platform, ready to make a daring leap, but there’s a problem: we can’t see where we’re supposed to land. Much like trying to complete a Dark Souls boss fight blindfolded, it’s a recipe for frustration.
Designing jumps that require players to trust in unseen platforms isn’t just a gamble; it’s a fast track to a broken controller. Instead, give your players a clear view of their destination, or at least a solid hint - a trail of collectibles, a guiding light, anything but a leap into the abyss.
The “Camera Conundrum”
Our next pitfall is one that’s as sneaky as a Metal Gear Solid stealth mission: the dreaded camera conundrum. A 3D platformer with a poorly designed camera is like a Final Fantasy game without its epic storyline; it just feels wrong.
Poor camera controls can lead to confusing perspectives, obscured views, and even unwanted character deaths - as unwanted as a Creeper in your meticulously crafted Minecraft base. So, make sure your camera is a friendly companion to the player, not a mischievous imp causing mayhem.
The “Overstuffing” Overstep
Last but not least, let’s talk about overstuffing. This pitfall is akin to an Animal Crossing player hoarding too many items in their inventory - eventually, it all just becomes clutter. In our quest to make the most exciting and dynamic levels, we might be tempted to stuff in as many elements as possible - enemies, power-ups, platforms, and so on.
While this might seem like a great idea (who doesn’t love a buffet, right?), it can actually dilute the quality of your level design. Just like a Super Smash Bros. match with too many items, it can become chaotic and overwhelming. Remember, a well-paced and balanced level with a clear focus will always beat an overstuffed, confusing level.
Wrapping Up
Designing 3D platformers can sometimes feel like you’re trapped in Cuphead‘s expert mode - it’s challenging, demanding, but oh so rewarding when you get it right. By keeping an eye out for these common pitfalls, you can ensure your levels are more like a perfect Mario Kart lap: smooth, satisfying, and leaving your players eager for more. Game on, designers!
Conclusion
You will play these levels more than anybody else, bar a few exceptions. Remember the longer you work on a game the harder it is to remember what it was like as a new player.
Just because you think something is easy doesn’t mean that it is.
Make sure you are playtesting your game at all stages of development. The quicker you learn you have a problem, the quicker you can fix it.
Get new people to play your levels. In an ideal world, you would use different people each time.
This could be someone’s first 3d game. Not everybody is going to have your game playing experience.
Level design is a rewarding experience, you are the ultimate teacher.
The goal isn’t to punish the player.
It is your job to teach the player new skills and create an increasing set of obstacles that are challenging but fair. You need to look at the game analytically.
Don’t just make hard levels because you like hard games. You are making these levels for the player, you are not competing with them.
So happy designing. Maybe you will design the next best 3d platformer and your greatness will be up there with the best levels in the game industry. You just need to keep iterating and testing your levels. Learn from the feedback and make small improvements every day.
What’s Next
Ok, so you’ve decided that 3d platform level design is the thing for you. That’s Great! But, you’re now probably wondering what’s the next step to take on your journey.
Well, fortunately, I’ve thought about that too. There are two ways I think you could further your education on 3d platform level design. They are:
Skill Up Your Game Design With Skillshare
Are you eager to dive into the thrilling world of 3D platform game level design? Hungry to master the art of creating immersive, exciting, and memorable virtual worlds? If you’re nodding your head, then we’ve got the perfect springboard for you: Skillshare’s premier course on Game design.
Much like the invincibility star in Super Mario Bros., this course will empower you to navigate the labyrinthine landscape of game design with confidence and flair. It’s a treasure trove of knowledge, designed to arm you with the skills you need to take your game design dreams from concept to reality.
But the adventure doesn’t stop there. Skillshare is like your personal Hyrule, teeming with a plethora of other game design and development courses. Imagine it as a vast open-world game, where every corner you turn unveils a new opportunity to level up your skills. Whether you’re an aspiring artist, coder, sound designer, or game tester, Skillshare has a questline for you.
So, let’s talk brass tacks. Are you serious about advancing your career as a game designer? If so, signing up for Skillshare’s one-year membership is as clear a choice as picking a legendary loot in an RPG. For just $170, you can secure a year’s worth of unlimited access to a treasure chest of knowledge that rivals any degree or master’s program.
Think about it. That’s less than the price of three next-gen console games, yet the skills and knowledge you’ll gain could be the key to unlock your dream career in the gaming industry.
But perhaps you’re hesitating. Maybe that $170 price tag seems steep. If so, let me ask you this: if you’re unwilling to invest that much in your future, are you truly committed to becoming a 3D platform level designer? This isn’t a casual mobile game, it’s more like a hardcore Dark Souls run - you need to be ready to commit if you want to succeed.
If that investment feels too daunting, then perhaps it’s time to ask yourself if you’re really ready to play in the big leagues, or if you’re content to watch from the sidelines on IGN while others live the dream.
Game design is an exciting, challenging field, and if you’re serious about it, investing in Skillshare’s one-year membership could be the best move you make on your journey. So gear up, and Sign up now to the Game Design Fundamentals Course on Skillshare, and let’s start designing the games of tomorrow, today!
Buy a book
Game Design Deep Dive: Platformers offers 145 pages of pure platform game design gold. It will teach you nearly everything you need to know about Platform level design. By the time you’ve finished working through it, you will have a portfolio you can use to get a job in the game industry. Click the image below to check the book out:
Buy A Game
Another way to learn 3d platform level design is to buy Super Mario Maker 2 on the Switch. Ok, before you start calling BS, Yes, I do know it’s 2d not 3d. But many design principles work across dimensions. Super Mario maker is actually packed full of tutorials made by the geniuses at Nintendo who design and make all of the Mario game levels. So you are learning how to make platform levels from the best in the business. Seriously, if you have a Nintendo Switch already, buying Mario maker is no brainer if you want to improve your level design skills. Click the image below to check the game out: