If you’ve owned your Nintendo Switch long enough, one thing is bound to happen.
The game console’s charging port will begin to collect lint, dirt, and who knows what else.
You’re unlikely to notice as your Nintendo Switch charging port gets clogged. That’s until you start experiencing problems when trying to charge your device.
My Nintendo Switch recently stopped charging.
I left it plugged in to charge overnight only to realize it hadn’t when I tried to power it on in the morning.
That’s when I noticed the adapter’s power cable wasn’t connecting as far as it should.
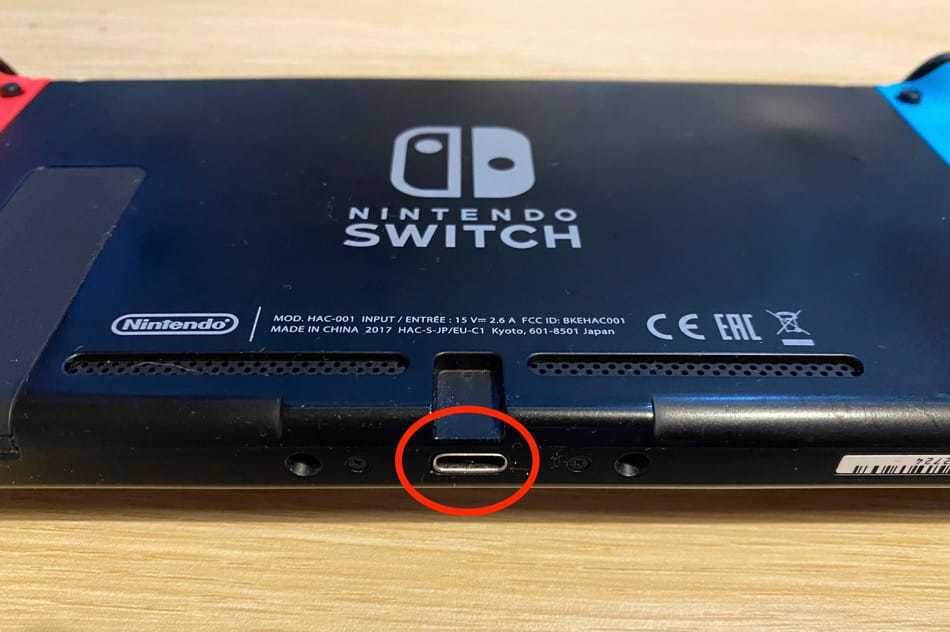
I quickly reached for my phone and turned on its flashlight to shine light into the Nintendo Switch charging port.
As I thought, the metal charging contacts inside the port were not visible. They were covered with dirt. This was causing the charging problem.
The collection of dirt, lint, etc., in the Nintendo Switch charging port, is one of the most common reasons why the console won’t charge.
The dirt collected prevents the charging cable and charging port from establishing a good electrical connection. Thus no power can go to your battery.
If you’ve found yourself in a situation where your Nintendo Switch isn’t charging, it might be time to clean its USB-C charging port.
How do you clean the Nintendo Switch charging port? To clean your charging port, you’ll need three readily available and affordable items: A Jewelers Loupe, toothpicks, and a can of compressed air. You can get all these items from Amazon at less than $25. This isn’t too bad because if you were to replace your Nintendo Switch because it isn’t charging, you would have to fork out close to $300 for a new one.
Because the charging port is exposed, you don’t have to open up your Switch to do the cleaning.
Read on for a step-by-step guide on how to go about cleaning your Nintendo Switch charging port without damaging the device.
What to do if your Nintendo Switch won’t charge
Before you start poking and blowing air into your delicate Nintendo Switch charging port, you need to be sure that a dirty port is the reason the game console isn’t charging.
There are several reasons why your Switch may fail to charge.
In my case, the charging port had a lot of debris, but this isn’t the only reason why your console might not charge.
Other possible reasons that may cause your Switch not to charge include:
- The power outlet might have burnt the fuse, so it can’t work properly
To check if the outlet you’re using to charge the Switch works fine, try charging another device, for example, your phone using the same outlet.
If the device doesn’t charge, the outlet could be the problem. Move the Nintendo Switch to another power outlet to see if it will start charging once you power the socket.
- The charging adapter might be damaged
You might have quickly pulled out the adapter after using it and damaged it. Check to see if the cables are bent or broken.
If the charging adapter is damaged, you might have to buy a new one. I recommend you get the Official Nintendo Switch AC Adapter from Amazon as a replacement.
This product was specifically designed for the Nintendo Switch. It is better to get this adapter than one from a third party that might not correctly charge your device.
- If you use the Nintendo Switch’s dock to charge, it may have been damaged.
Check the Switch’s dock also to ensure its cables are correctly connected. If you find them intact, you might have to have your dock checked for any internal damages.
Or, you can replace it with the Nintendo Switch Dock Set from Amazon. The set includes a Nintendo Switch dock, Nintendo Switch AC adapter, and high-speed HDMI cable.
- The battery is completely depleted
If you don’t charge your Nintendo Switch’s battery for a long time after draining it, it might not immediately start charging when you plug the power adapter. Try leaving it overnight charging and see if it will power on the next morning.
- You could be using a third-party adapter that is incompatible with your console
A third-party adapter may not work with your Nintendo Switch, or it could damage it. That’s why I strongly recommend that you always use your original Nintendo Switch charger.
- You made modifications to your Switch settings
If you made changes to your console’s settings, you might have made some that affect how the device charges. Go through the settings to ensure they don’t affect how the device charges.
So before you jamming things into your Nintendo Switch charging port or decide to send it for repairs, do some troubleshooting to ensure none of the above has happened.
How to properly clean the Nintendo Switch charging port
If, after troubleshooting, your Nintendo Switch still isn’t charging, and you decide to clean your console’s charging port follow the steps below.
But be very careful when doing the cleaning, so you don’t break the charging port.
What you’ll need before you start cleaning your Nintendo Switch charging port:
- A Jewelers Loupe to help you get a good inside view of the charging port.
- Toothpicks, look for the ones made from bamboo. They do the best cleaning.
- A can of compressed air which you’ll use to blow out dirt from your consoles port.
You can buy the items from Amazon by clicking the blue links provided (Yes, we use Amazon Affiliates so that we can earn some money to pay the bills and keep this website going .):
Cleaning your Nintendo Switch charging port: The process
- Make sure your Nintendo Switch is off
Press and hold the power button to turn off your device. Turning off your Switch before cleaning will help ensure no damage occurs to the electrical parts.
- Hold your console with one hand and look into your Switch’s charging port

You can use your phone’s flashlight or the Jewelers Loupe I recommended you buy to see inside the charging port. If there are any large pieces of debris that you can see, pick them out. You can use your fingers or tweezers to do this.
- Try charging your Nintendo Switch
If it begins to charge, then congratulations, you’ve cleaned out your console’s charging port. If it doesn’t work, you’ll have to continue with the cleaning.
- Shoot compressed air into the Switch charging port

Air loosens and blows out dirt. So before you start inserting anything into the charging port, do this.
Take the can of compressed air and use its straw-like nozzle to blow 1-2 seconds blasts of air into the port.
Keep the can straight when spraying so that it doesn’t leak liquid into the port. Also, don’t spray directly into the port as this could push the debris further inside and make the problem worse.
Instead, place the nozzle at a 45-degree angle and aim for the USB port’s long axis.
At this angle, the dirt inside the port should escape when you blast the compressed air.
Don’t blow too much air into the port as this could make the area moist. After 2-3 blasts, try charging your Nintendo Switch.
- Move on to a toothpick

If compressed air doesn’t remove all debris from the charging port, use a toothpick to get out the left dirt.
If you’re wondering why a toothpick and not a needle or pin, the reason is you should never insert metal objects into a charging port.
Metal scratches the delicate contacts in the port, and can damage them. A toothpick is also not an electrical conductor. Metal is and can short out your device.
Slowly move the toothpick’s sharp edge in an up and down motion around the sides of the central electrical contact inside the port. Repeat this motion until the debris loosens.
Be careful not to bend the electrical connection.
When done, blow compressed air into the port once more to eject any dirt loosened by the toothpick.
- Connect your Nintendo Switch to the charging adapter
If the console starts to charge once you connect it to its charger, well done. You have successfully fixed the no charging problem.
But before you move on to something else, check to ensure the USB cable connects all the way into the port.
If it doesn’t or easily comes off, it is likely there is still some debris in the port.
Repeat the steps above to clean your console’s charging port thoroughly.
If your Nintendo Switch is not charging after cleaning the charging port, go through the what to do if your Nintendo Switch won’t charge section of this article again.
This will help you confirm that the console is not charging because of another problem like a faulty power supply or settings.
How to keep your Nintendo Switch charging port clean in the future

The Nintendo Switch uses a USB-C charging port.
If your port is constantly getting dirty, try changing where you store it. It could be that you place it in very dusty areas.
Some gamers cover the port with a small piece of tape to ensure it doesn’t get debris when not in use.
A more elegant way to keep your Nintendo Switch port clean is by buying a plug you can use to cover the port and keep out dirt.
I recommend the 10 pack innoGadgets Anti Dust Plugs. These plugs protect your Switch’s port from dust, water, and dirt. This simple and inexpensive device can increase the lifespan of your console.
To use the plug, you have to place it on the port and press it down, and you’re done.
Conclusion
Your Nintendo Switch’s charging port is continuously at risk of being filled with all types of dirt.
So if your port suddenly stops working or the charging cable doesn’t fit into it, you most probably need to clean it.
The best way to clean your port is with toothpicks and a canned compressor.
The toothpick will loosen any dirt inside the port, which you can blast out with compressed air.
To protect your port from getting congested with debris in the future, you can purchase protective cases like the 10 pack innoGadgets Anti Dust Plugs to cover your port when not in use.
What Next?
How Do I clean my Nintendo Switch Air Vents? Cleaning your Switch’s air vents is quite an involved process that needs to be done in a specific way to ensure you don’t damage your console. Take a look at my article here to learn how to clean your Switch’s air vents effectively and safely.