So, you’ve got mud/gunge/dirt/other things (Ewww!) in your PS4 controller port, and now you can’t insert the USB cable to charge your controller.
I know how you feel. I’ve done the same thing myself. I dropped my PS4 controller into liquid candle wax once (don’t ask.), and all the wax stuffed itself right into that little charging hole to annoy me!
But, from experience, I know it is possible to clean the PS4 controller USB charging port. So long as you’re willing to take your time and, well, not stick metal things into it.
How do you clean the PS4 controller USB Charging Port? You need 4 tools: A loupe, toothpicks, some heavy books, and compressed air. You then use all 4 of these tools to slowly remove any debris from your PS4 controller’s USB Charging port.
Though this procedure seems easy, and it is, you have to do it carefully. Think of how walking is easy, but walking along a 1-meter wide pathway suspended 1000 meters above the ground needs to be done carefully.
So for a full explanation of all the tools I’ve used, the complete process, and how to avoid breaking your controller in the process, keep on reading.
Warning: Check Your USB Cable First!

Before you start sticking things inside your PS4 controller’s charging port, I really recommend that you test a different USB charging cable with your controller first.
If you can save yourself sticking things that don’t belong inside your controller’s USB port, you probably should.
I have found, on more occasions than I care to admit, that when I thought the PS4 the controller was broken it was actually a faulty cable.
Micro USB cables are designed to be sacrificial. So, in the event that the plug gets pulled out quickly or bent slightly, it’s the cable that will usually break. Not the port.
So again, try your PlayStation 4 controller with a different charging cable before you start rummiging around inside the port. You might just find that there is nothing wrong with the controller and it was just the cable.
What You’ll Need to Clean the PS4 Controller USB Charging Port
A PS4 controller is around $50 dollar to buy brand new. So anything you use to clean your Controller port has to cost a good bit less. Otherwise, what would be the point in fixing it? You may as well just plonk $50 down for a new controller.
Fortunately, you don’t have to spend a lot to fix the charging port. Plus all the materials I’m recommending you use are really useful in their own right, especially for the sort of gamer like yourself who is willing to tinker with their toys, which you obviously are because your willing to attempt this.
Ok, so here’s the list of stuff you need. All the items can be conveniently bought from Amazon links through these magical blue links (Yes, we use Amazon affiliates so we can make enough money to stop Bluehost sending evil lawyers after us.):
- A Jewelers Loupe with LED Lights (Way cheaper than magnifying glasses) – So you can see what you are doing – These things are amazing. I use one to help tune my fountain pens. And you thought Gaming was the hight of Geekiness! You’ve got nothing on me and my pen collection!
- A few large books or heavy Things – To prop up the PS4 controller and hold it in place to leave both your hands-free.
- Toothpicks (The really sharp Bamboo ones are best) – Bamboo wood or plastic ones are good enough for digging out the crud in the PS4 controller port.
- A can of Compressed Air – Great for blasting unwanted dirt out of little holes. Also doubles up as a non-lethal “plasma cannon” for when bugs invade the house in summer.
The total cost of the above items should come to less than $25 dollars. Which isn’t too bad considering a new official PS4 controller will set you back more than double that amount.
Cleaning Your PS4 Controller’s Charging Port: The Process
!! Warning !!
Please remember, you clean your PS4 controller USB charging port at your own risk. This worked for me, but you can easily damage your controller if you are not careful. And, obviously, I can’t take any responsibility if you do break your controller.
Do not stick metal objects inside the controller charging port such as pins. They can and will wreck your controller. Stick to using plastic and wood picks, or don’t do it all.
And of course, don’t use water. That includes blowing into the charging port. Water will short out the electronics and quickly transform your controller into a pretty useless doorstop (Seriously, I’ve tried this! PS4 controllers are bad door stops. They are just too light). So keep the water, and your spit, away from the port.
Ok, now that that is out is out of the way, lets crack on with the process…
1: Disconnect the PS4 Controller
Make sure your PS4 controller is completely disconnected from the PS4 or other sources of electricity. You don’t want a bad case of frizzy hair when you get a mild electric shock because your controller is still plugged in.
2: Prop up the PS4 controller so the port is easily accessible
Now you want to take your heavy books or objects, and place them around the PS4 controller so the controller is held with the USB port facing toward you. You want it held as firmly in place as possible so you have both hands free to work.
3: Shoot compressed air into the controller port

Before you start jamming things into the inside of the PS4 controller USB socket, you want to try and blast any dust and debris out of the hole by shooting some compressed air in there.
Take the compressed air can. Ensure the long nozzle is attached. Now, aim the nozzle into the USB Socket.
Tilt the nozzle to a 45-degree angle while aiming along the long axis of the USB port. And be keep the nozzle tip 1-2 cm away from the port. You want to do this so that the compressed air has a chance to escape and push and dust and dirt out the other end of the USB port.
Now, give the air can a short blast. Do not keep shooting air into the USB port for a long period of time. Air under pressure forces moisture too condense. And you don’t want that. So just give it a short sharp blast.
Then give it another short blast from the other end of the USB Socket.
4: Try your controller
Now that you’ve blasted the controller with compressed air, you want to test it out.
If you’re lucky, the shot of compressed air blasted any dust and dirt out of the USB socket. So, fortunately, you won’t have to start jamming and jabbing things into it.
If the controller works, then congratulations, you’ve cleaned out your USB socket on your PlayStation 4 controller.
If your controller still doesn’t work, then sorry, you’ll have to do a little bit of surgery on the USB socket and clean it out even more.
5: Look inside the USB Socket with your magnifying loupe
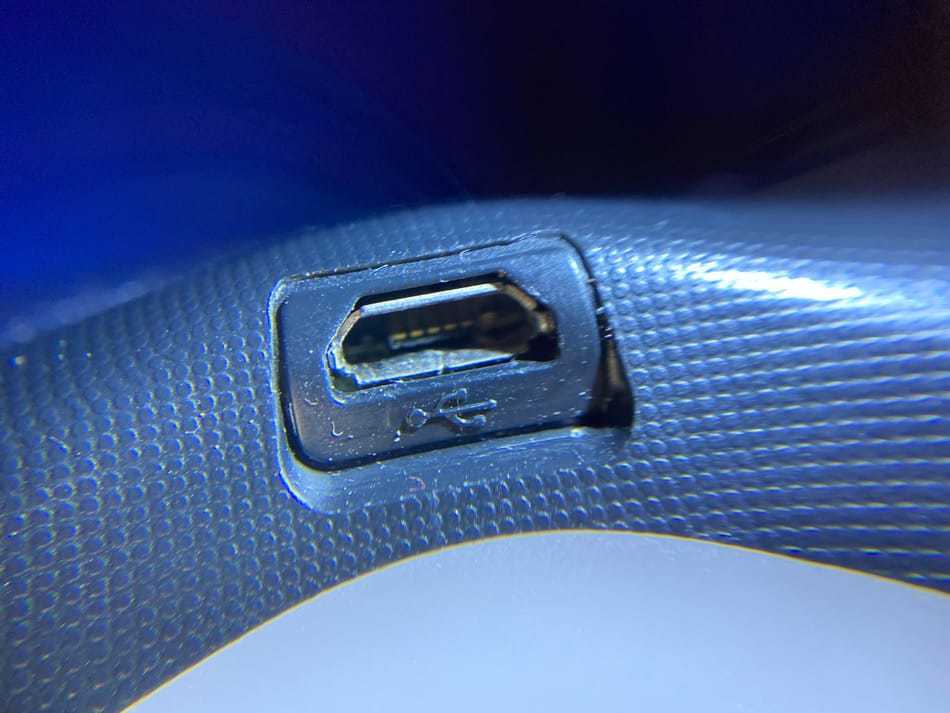
The next thing you want to do is find the obstruction inside the USB socket. To do this you’ll need some sort of magnifying device as pointed out in the “what you’ll need” section.
Make sure your controller is held in place by some of those heavy objects we talked about to keep both your hands-free. Then grab the loupe, turn on the LED lights, and take a good look inside. If you don’t have an LED on your magnifying tool of choice, try to get your controller under a strong light so you can see what you are doing.
You may still find it hard to see the dirt.
But that’s OK. The loupe is used to help you see what you are doing when you are poking and prodding away inside the PS4 controller’s USB charging port.
6: Take a toothpick and start cleaning the port

Now comes the tricky bit…
Take a toothpick, remember they have to be very fine, and insert it slowly into the USB port.
You may notice a very thin sheet of metal suspended in the middle of the USB port. This is the actual connector that fits into the USB cable.
Do not bend this.
Try to clean around the wider areas in the USB port. Use a digging motion to “scoop” the dirt out of the port.
Alternitivly, lightly move the toothpick’s point around the edges within the USB port to help dislodge any dirt.
Then, every so often, take the controller in hand, turn it upside down, and tap it gently to try and dislodge any of the dirt.
But please take it slow and be gentle. Too much force will damage the mechanisms inside the port.
Do not try to clean behind the thin strip of metal inside the USB port. The gap is about 1 sheet of 100 GSM paper wide. You can try to run some thin paper through there. But anything wider will force the strip out of alignment.
7: Another blast of air
Next, give the controller’s USB charging port another blast of air with the compressed air can. This should help remove any grit and dirt you couldn’t drag out with the toothpick or tap out when the controller was upside-down.
8: Test your controller
The next step is to test your controller. Plugin the USB charging lead. Check to see if the PS4 controller’s light turns on.
If it does, well done, you have successfully cleaned your PS4 controller’s USB charging port.
But wait…
Be sure to check that the USB cable pushes all the way into the port. If it doesn’t insert all the way in there or there is a grinding sound, there may still be debris in there. You’ll want to repeat all the steps above in this case.
If your USB port is still not working…

If your USB port is still not working, there may some small grains of sand or dirt in behind the thin side metal strip in the port. This is very hard to get behind.
You could, and you do this at your own risk as it will probably break your controller, bend the strip forward slightly so you can get in behind it, then bend it back after you have cleaned. But I do not recommend this as bending fragile metal things is never a good idea.
Instead, I would keep try sliding slivers of paper behind the metal strip, and keep blasting the port with compressed air to dislodge stubborn dirt.
Conclusion
If you managed to fix your controller. Well done!
You just saved another piece of plastic from being dumped in landfill, you saved yourself a load of cash, and you learned a new skill that you can use for other controllers and devices in the future.
All in all, I think you deserve a pat on the back. But I can’t give you one because I’m in a rain-soaked valley in South Wales. Which is probably half a world away from where you are.
If you have further problems with your controller, please read the “What Next?” section below.
Thanks for reading. And please tell your friends about this article and CareerGamers. Your recommendations really do make a huge difference.
Thank you.
What Next?
I don’t think I can fix my PS4 controller’s charging port. Is there another way to charge my controller? Actually yes there is, the PS4 controller has a secondary port on the front side called the EXT port. We have a great article here that’ll help tell you about how to use the EXT port here. Or you can buy a charger for the EXT port here.
I’ve got crud in my EXT port! What should I do? The process detailed in this article will work just fine with the EXT port and it can easily be cleaned out.
Neither my EXT Port nor USB port is working on my controller. What should I do? OK, you might be up poo creek without a paddle here. You can try replacing the entire USB port. But it involves taking apart your controller and replacing the USB port completely. Take a look at this YouTube vid. Warning, taking apart your Controller will void its warranty.